Skiaform / Guides
Bubble diagram in architecture: how to draw one
How to draw a bubble diagram in architecture: circles sized by area, an adjacency matrix and clear links, developed into blocking and a floor plan.
A bubble diagram in architecture shows rooms as circles sized by area, and the relationships between them, before any plan exists. Because the circles move freely, you can try out which spaces belong together and which need distance without committing to walls or room shapes. Start an architectural bubble diagram from your room list and areas, then give every connection a reason.
What is a bubble diagram?
It is a way to test the relationships in your brief. Each circle carries a space name and an area, and lines show the links that matter. You can compare room sizes while their shapes stay open.
A parti diagram does a different job: it explains the scheme's main organising idea, such as rooms gathered around a courtyard, in a few marks. Working through bubbles is often how you arrive at that idea.
A blocking diagram comes next. Circles become rough rectangles of the same area, and you start checking how they fit inside a boundary, changing proportions as you go.
The plan then fixes walls, openings and circulation, and checks the dimensions and routes the bubbles leave open. A line between two circles records a relationship; the plan is where you design the actual connection.
Read the bubble diagram notation
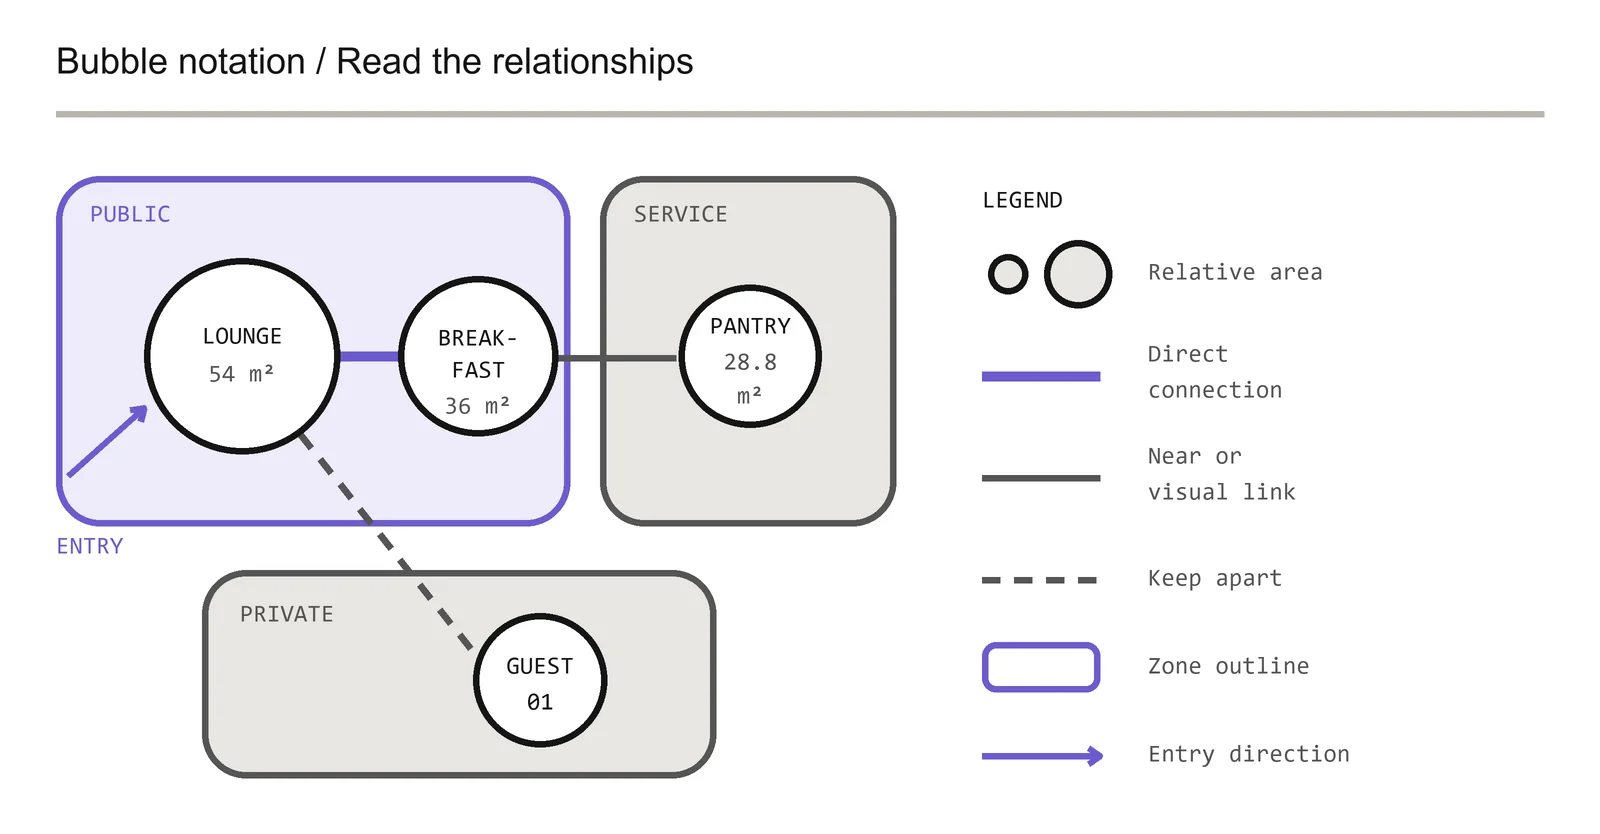
Size circles by area, with one multiplier for the whole drawing. If you set diameters from room areas instead, big rooms look far bigger than they are, because area grows with the square of the diameter. To work out a radius yourself, divide the room area by pi and take the square root.
Give the lines a legend. In this guide, a thick solid line means a direct connection, a thinner solid line means near or visually linked, and a dashed line means keep apart. Other conventions work too, as long as you define yours on the page.
Loose outlines can group public, private or service spaces when that helps explain the arrangement, and an entry arrow shows where the route begins. Use one accent colour and let line weight and labels carry the rest.
Start with an adjacency matrix
Before moving any circles, compare your spaces in a matrix. Every pair of rooms gets one cell, where you record the relationship you need. Write the room list once, keep the names consistent, and work through all the pairs before drawing a layout.
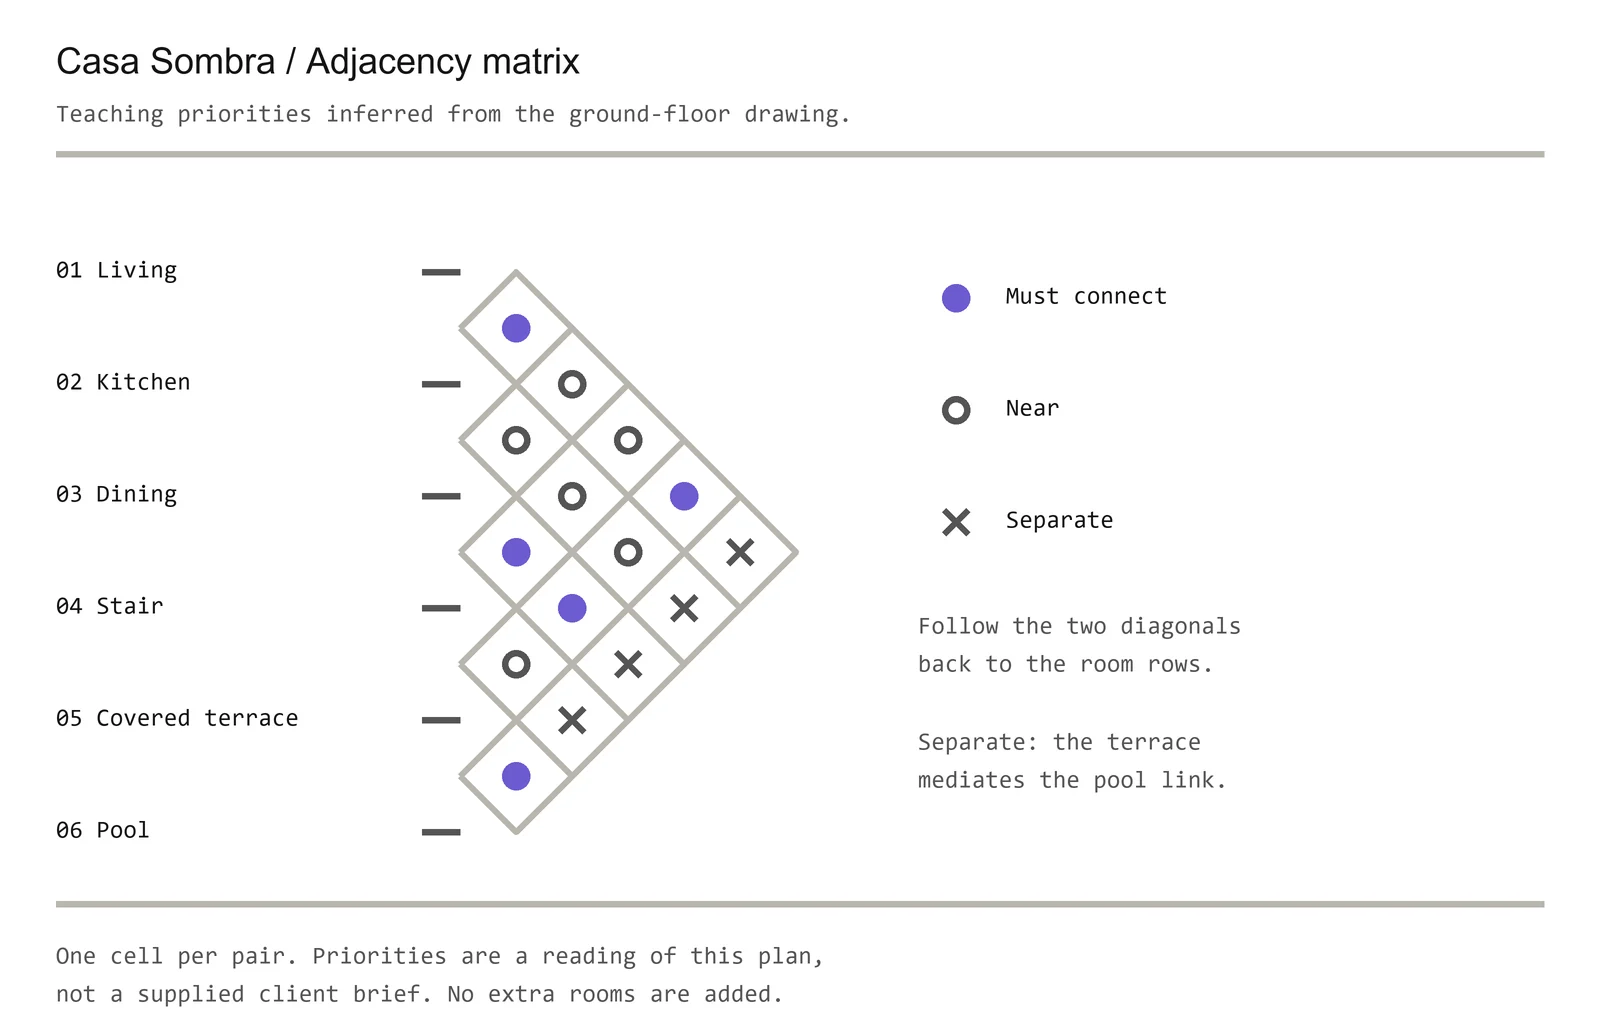
In the half-diamond grid, follow the two diagonals from a cell back to the room rows to find its pair. Each pair appears once, so there is no reversed duplicate and no cell comparing a room with itself.
The legend has three priorities:
- Must connect: the two spaces need a direct relationship.
- Near: you want them close, without a direct connection.
- Separate: keep them apart, or put another space between them.
Casa Sombra and the Courtyard Guesthouse are fictional sample projects. The Casa Sombra priorities are a reading of its ground-floor plan for teaching. Living and kitchen share one open volume, and the matrix marks that connection along with living to terrace, dining to stair, dining to terrace and terrace to pool. The separation crosses reflect that the pool connects to the indoor rooms only through the terrace. In your own matrix, decide what "separate" means before you use the mark.
From bubbles to a plan
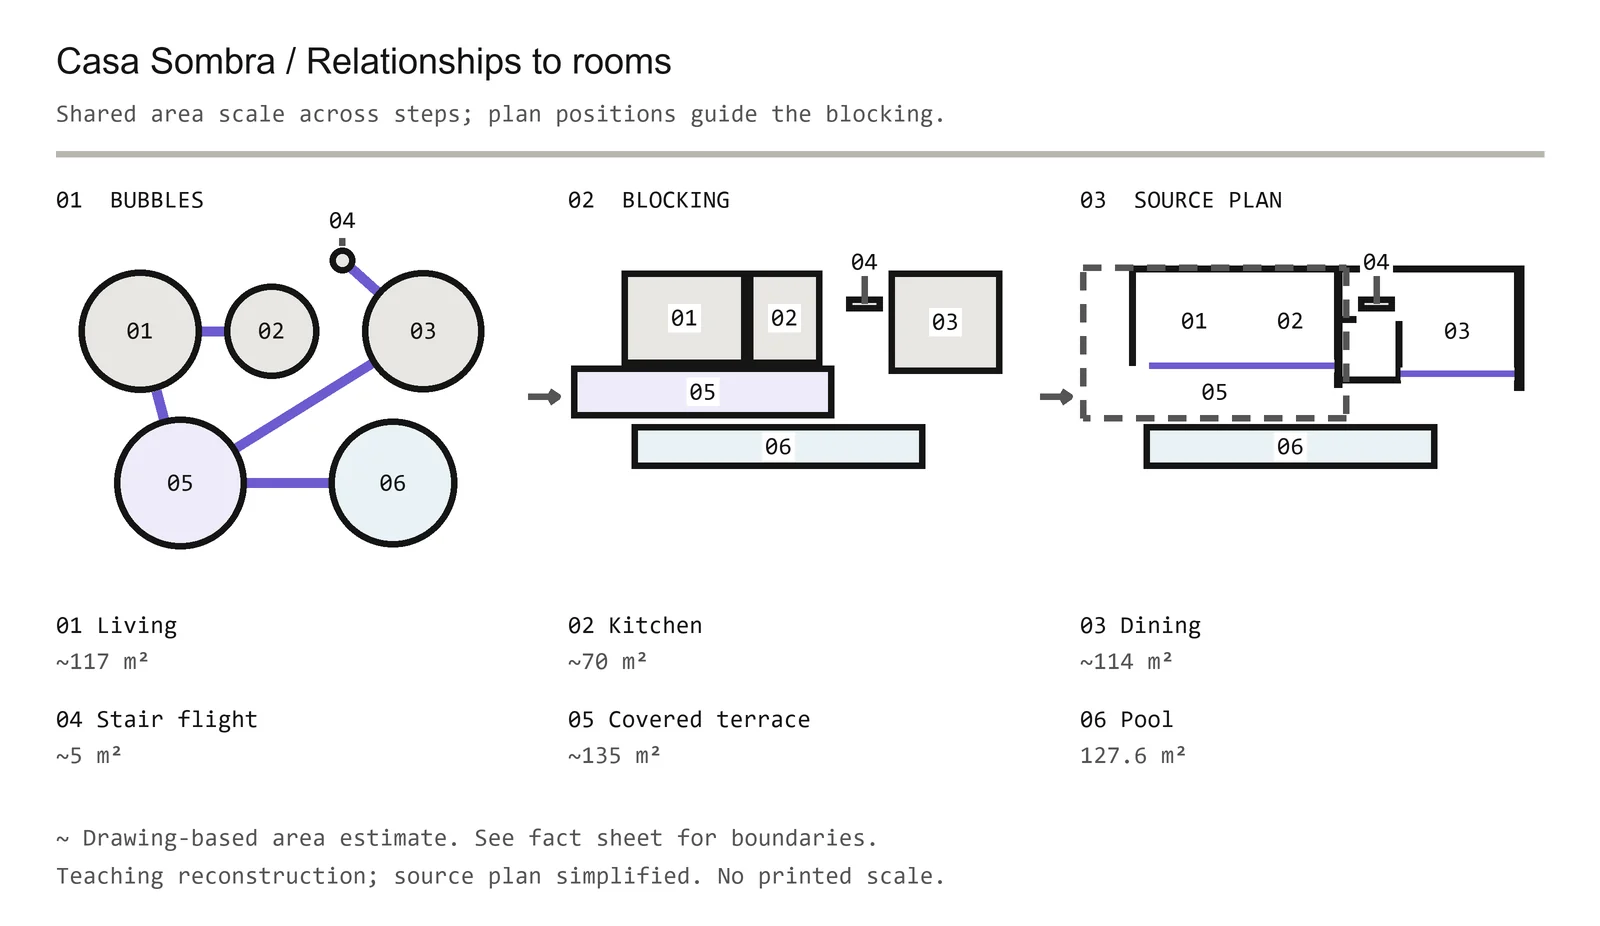
The Casa Sombra sequence runs from circles to blocks to the simplified plan, working backwards from the finished drawing to show the method.
The areas are approximate: living about 117 m² and kitchen about 70 m², split for illustration within one open space; dining about 114 m²; the covered terrace about 135 m²; and the pool 127.6 m² of water. The stair bubble, about 5 m², covers the flight itself.
The bubble stage draws only the direct links from the matrix. Proximity and separation stay in the matrix rather than adding more strokes.
Next, each circle becomes a rectangle of the same area, and you adjust its proportions for depth, frontage and fit. Here the blocks follow the sample's arrangement: living and kitchen to the west, dining and stair to the east, the terrace in front and the pool beyond. All three stages share one area scale. Note that the line between the living and kitchen blocks is only an area split; in the plan it never becomes a wall.
Bubble diagrams in interior design
An interior design bubble diagram starts inside an existing shell, so keep that boundary in view. Each proposed connection has to work with the openings and circulation the building already has.
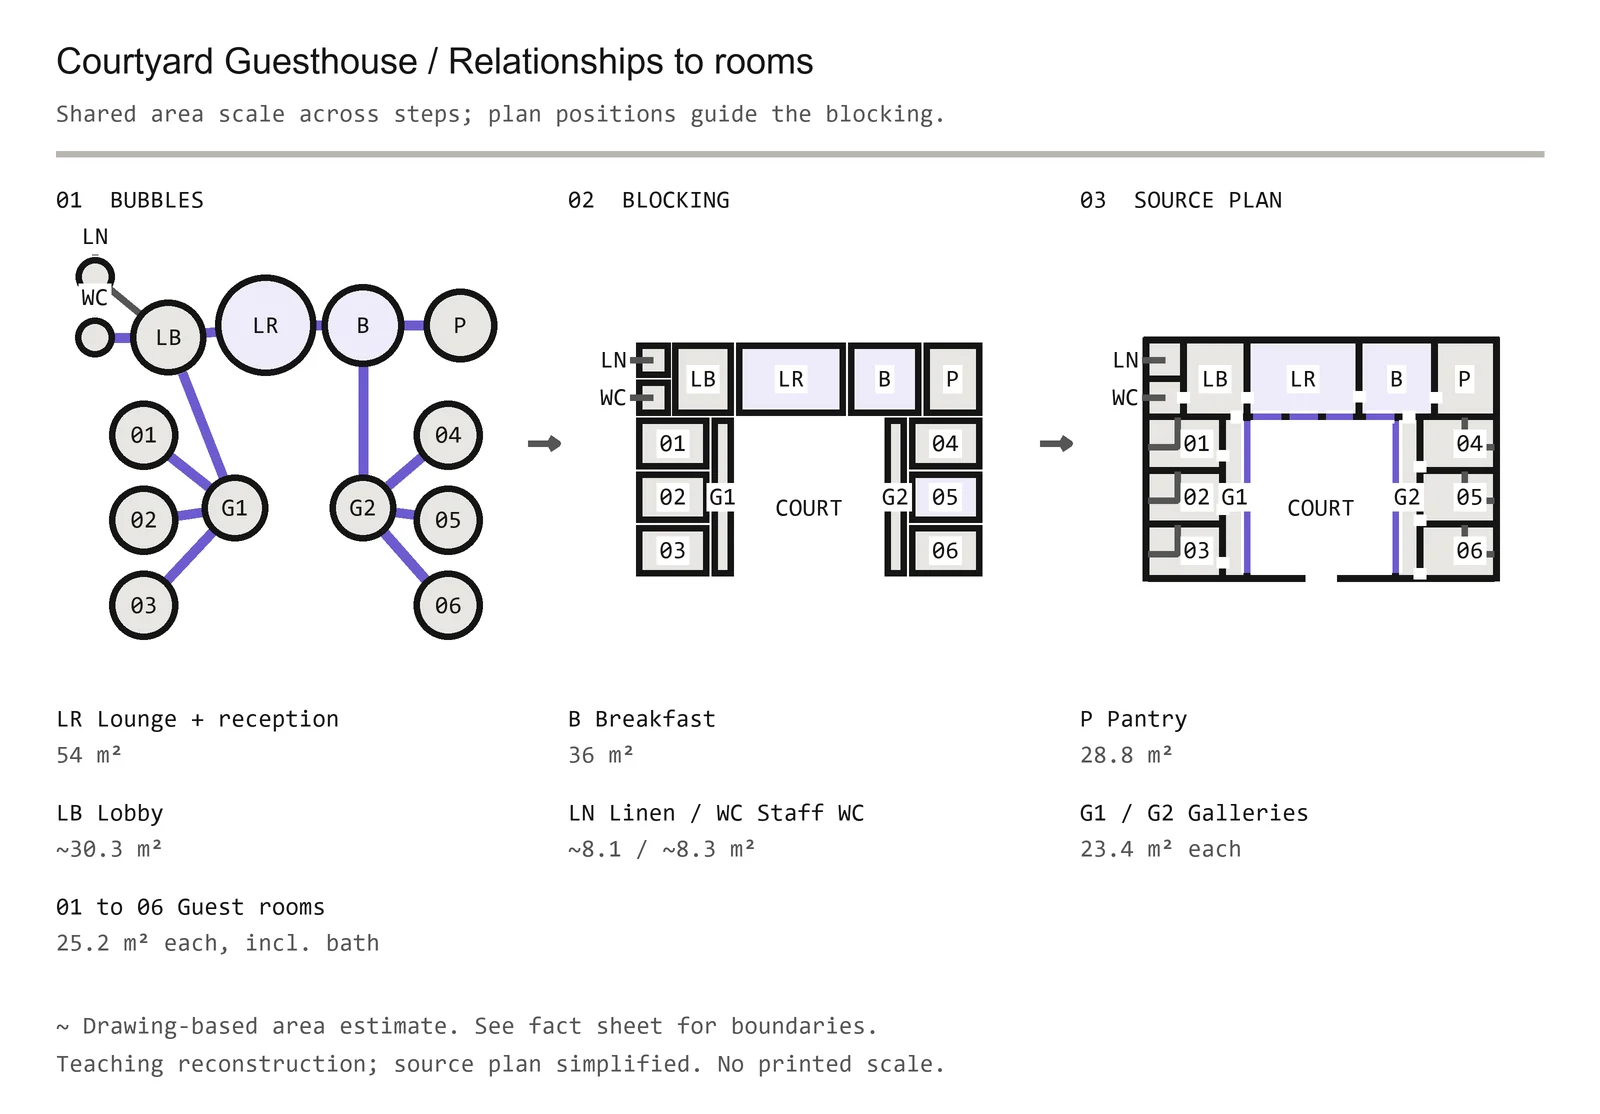
The fictional Courtyard Guesthouse is a U-shaped building around a courtyard. Its public north wing holds lounge and reception in one 54 m² room, a 36 m² breakfast room, a lobby and support rooms. Each guest room is 25.2 m² including its bathroom, so the bathrooms don't get bubbles of their own.
Follow the gallery links: three guest rooms open onto each courtyard gallery, the west gallery reaches the lobby and the east gallery reaches breakfast. The galleries belong in the diagram because they explain how you get from the public wing to the rooms. The courtyard stays visible as a void within the shell rather than as a bubble.
Zones: a second reading
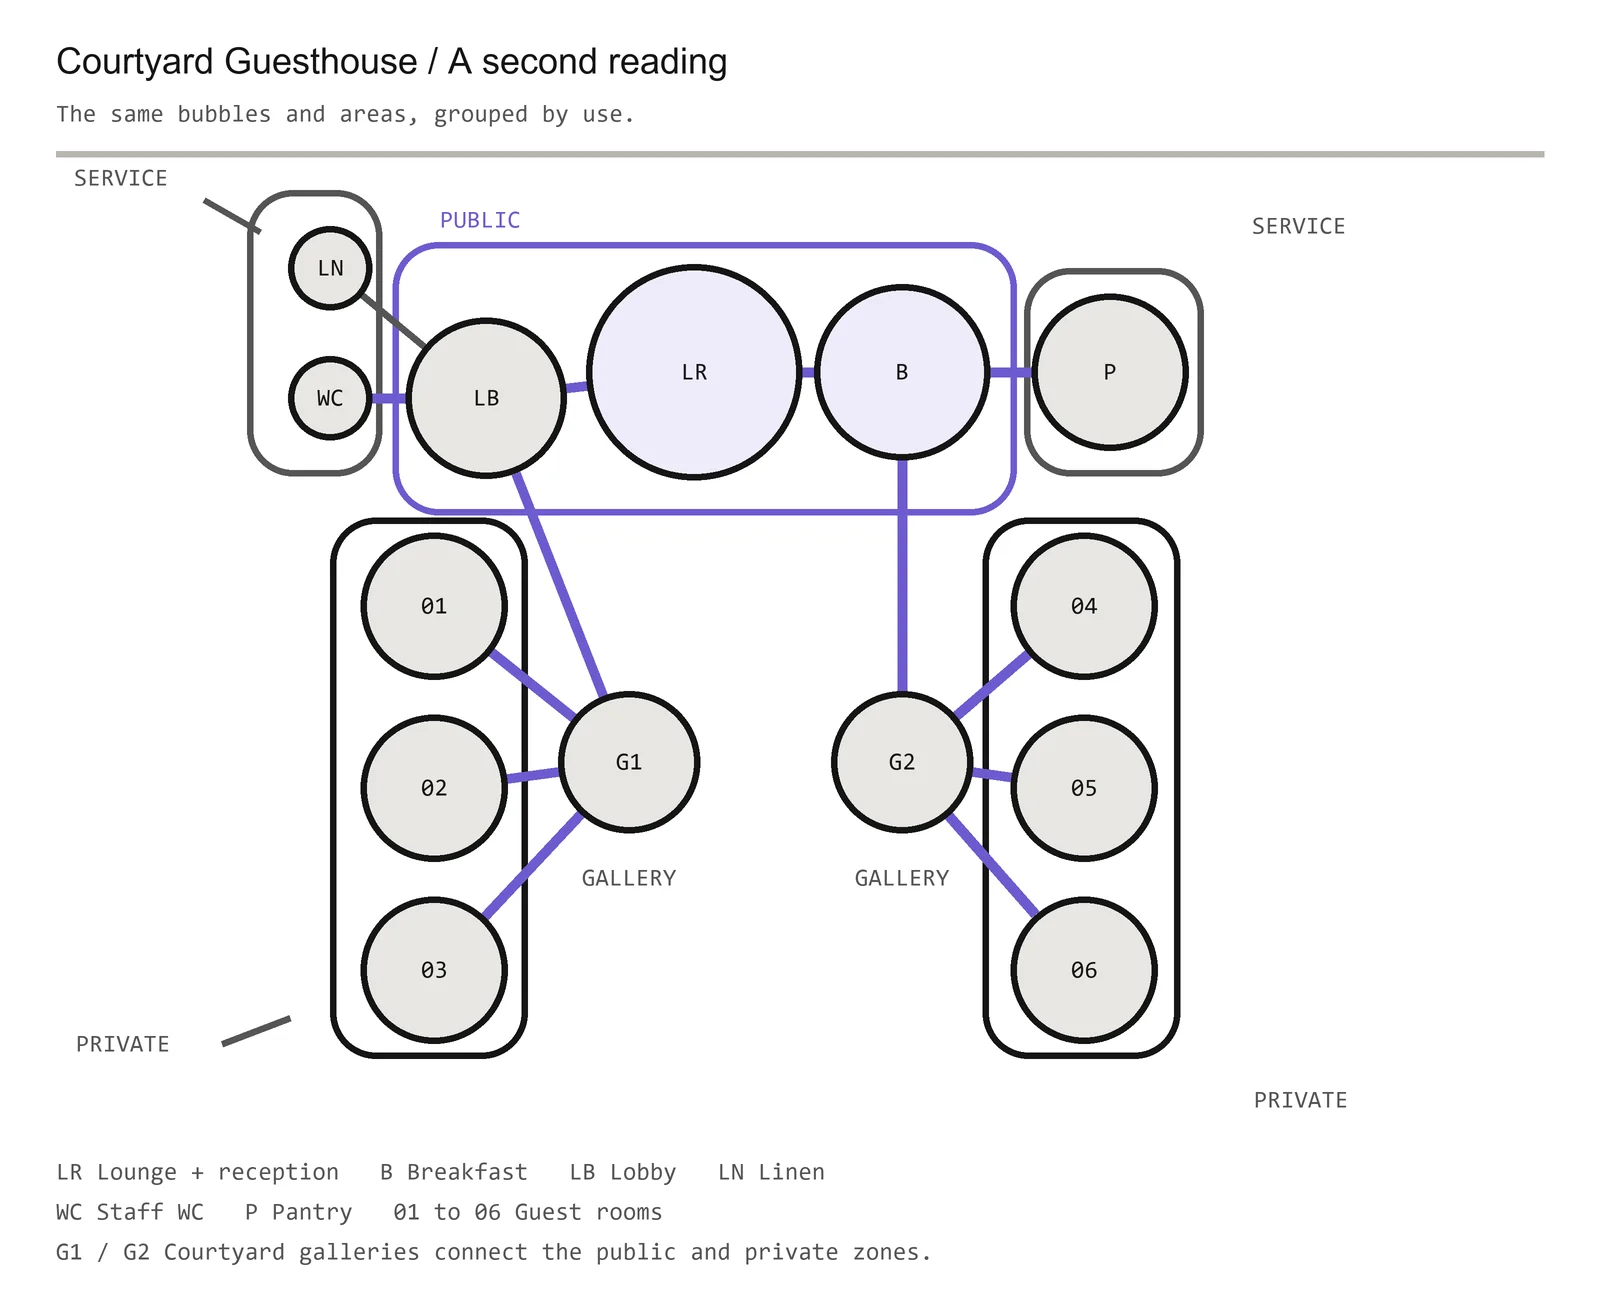
The same bubbles can be grouped without changing their areas or links. In the guesthouse, the public outline gathers lobby, lounge and reception, and breakfast; private outlines gather the guest rooms in each wing; service outlines take in linen, the staff WC and the pantry. The two galleries sit between public and private, so keep their links visible as you add the outlines.
Zones are a quick test of whether uses group sensibly. Questions like fire separation, security and acoustics come later, in the plan.
Two common mistakes
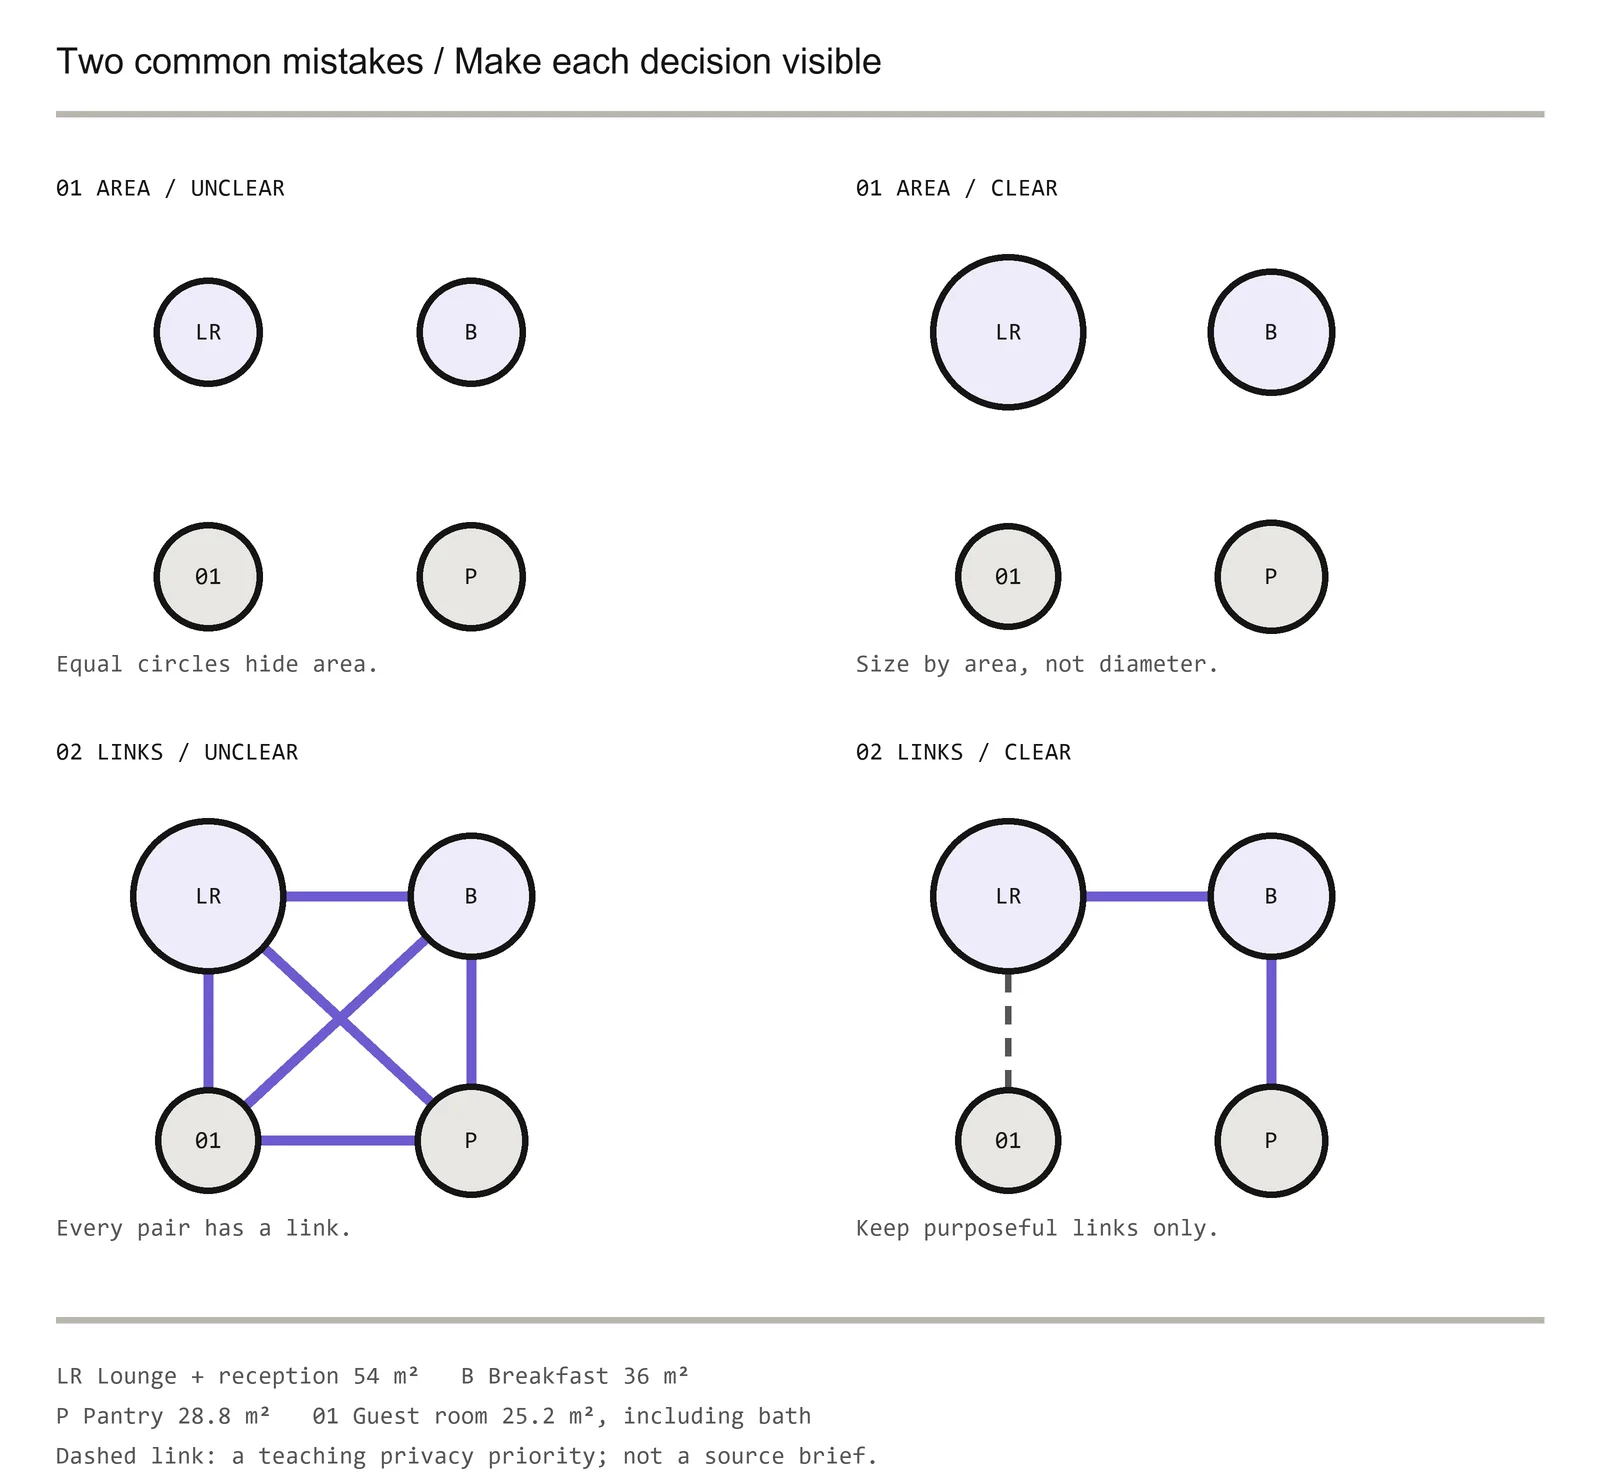
Equal circles hide the differences in area you have to work with. In the first comparison, the lounge, breakfast room, pantry and a guest room all have different areas, and sizing the circles by area shows how much of the layout each one needs.
Linking every pair hides your decisions. In the second comparison, a few chosen links are far easier to follow than the full web. Give every stroke a meaning you can explain.
A few more to check before moving on:
- Arranging the bubbles to look like a finished plan too early. Move a group and see what changes.
- Leaving out circulation and outdoor spaces that shape the organisation. Without them, connections look simpler than they are.
- No entry. Mark it, and check that the diagram explains the first movement from it.
Place it beside the plan
Keep the bubble diagram small and next to the plan, early in the project's pages. Match its line style to your other drawings, and use the same room names or numbers so the two can be compared directly. The architecture portfolio layout guide covers arranging the page.
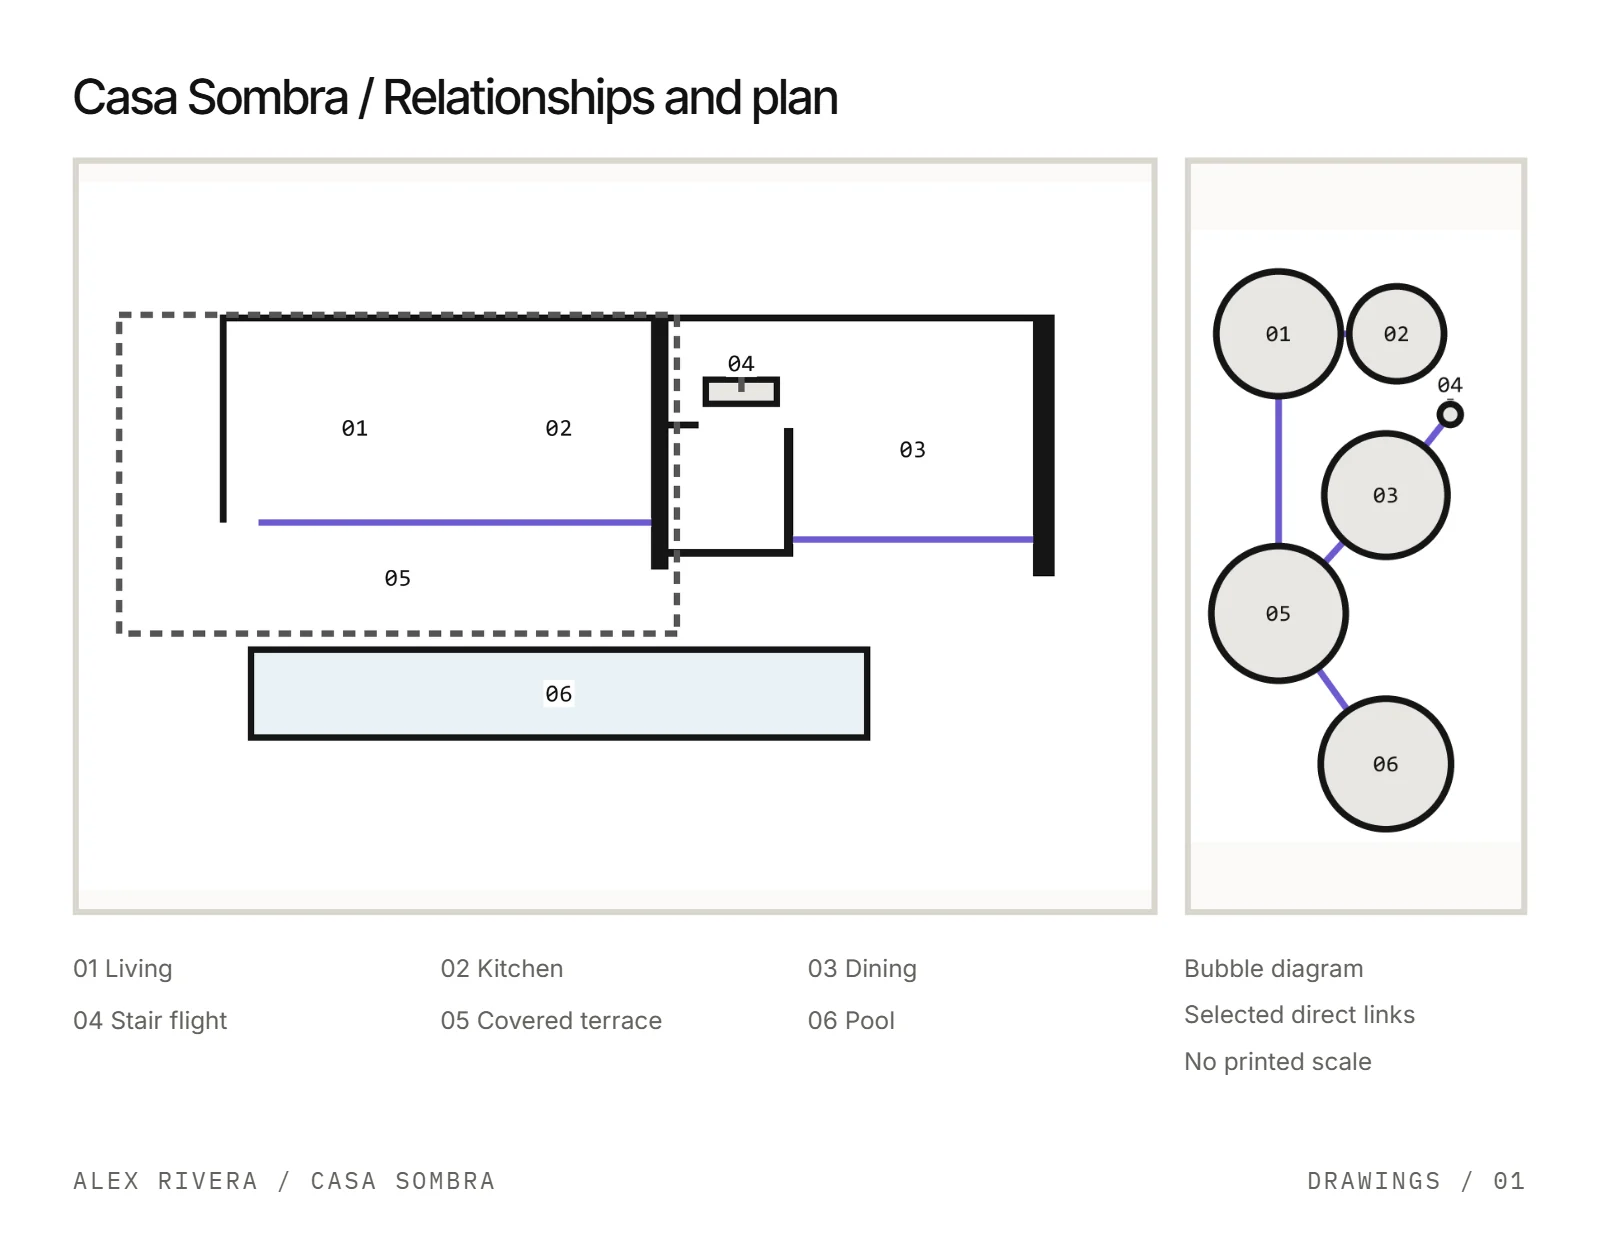
This Casa Sombra page places a rearranged bubble diagram beside the simplified plan. The circles keep their relative areas, though the diagram and the plan are each fitted to their own frames rather than drawn at one scale.
Use a bubble diagram template
A bubble diagram template needs three things: your list of rooms and areas, a blank matrix and a small legend. Leave room to move circles and redraw links. Hand or digital both work, as long as the circles stay sized by area.
Skiaform has a free bubble diagram maker that draws bubbles to area and builds the matrix as you set the links. Check the relationships against your brief before developing them into blocks and a plan.
The Skiaform Portfolio architecture portfolio template and its interior design edition have drawing pages with a side frame for a diagram like this. The free portfolio checklist helps while you assemble the pages.
FAQ
What is a bubble diagram in architecture?
A drawing that shows spaces as circles, sized by area, and tests their relationships before you draw a plan. Labelled line types explain the connections you want to develop.
What is the difference between a bubble diagram and a parti diagram?
A bubble diagram tests room relationships while the arrangement is still open. A parti diagram explains the organising idea of the scheme you chose, in a few masses, voids or directional marks.
What is an adjacency matrix?
A grid that records one priority for each pair of spaces: must connect, near, or separate. It helps you decide the relationships before you arrange the bubbles.
Should bubbles be drawn to scale?
Keep their areas proportional to the room areas so the spaces can be compared. Their positions stay free while you test relationships, and estimated areas should be labelled as approximate.
Can I make a bubble diagram digitally?
Yes. Use circles sized by area, text labels and line styles that match your legend, then check the result at the size it will be printed so names and line types still read.
Get the free portfolio checklist
A two-page checklist of the portfolio basics, from choosing projects to sending the PDF. It downloads as soon as you sign up. No spam.