Skiaform / Guides
Industrial design portfolio: examples and a practical guide
Build an industrial design portfolio with selected projects, clear process pages, technical drawings, matched CMF boards and an email PDF under 10 MB.
Your industrial design portfolio can trace an object from an early sketch to the joint that holds it together. For an internship or first job, start with studio projects you can explain through that development. These industrial design portfolio examples use fictional student work to connect process, drawings and finished views. Give each page enough space to make its decisions visible.
What an industrial design portfolio needs to show
Identify the problem and the person using the object beside the opening image. Describe the task you addressed, such as directing light across a desk or controlling a pour. Give your reader enough context to understand the decisions on the following pages.
Show how an idea became a resolved form through selected sketches, form studies and mock-ups. A change in handle shape means more when you place the earlier option beside the refinement and explain why you changed it. Keep the explanation tied to evidence you actually produced.
Explain the proposed build through materials, joints and an exploded view. Name manufacturing intent where you developed it, and distinguish a proposed assembly from something you fabricated. Colour, material and finish, or CMF, should agree with the final views. End with a clear image of the object and a view showing its use.
Choose your projects
Select 3 to 5 of your best projects. If your work supports it, include different scales and materials: a small appliance can sit beside furniture or a tool. Carry at least one project into technical drawings so you can explain more than its outer form.
Label each project as academic or professional and identify your contribution to shared work. The fictional Arc Pour-over Kettle is an academic project by a team of two. Rowan Ellis contributed form studies, spout flow tests and the CMF board; those credits belong beside the project facts.
Keep your product design portfolio focused on work you can discuss in detail. A repeated project type earns its place when it shows a different problem or construction approach. Remove weaker work before allocating pages.
Build a short sample and a core portfolio
Prepare a 3 to 5 page work sample and a 10 to 14 page core portfolio using one page system. Condense projects for the short version, keeping the same titles and credits. Give the core room for the development and drawings that need a closer reading.
For a five-page work sample, use:
- Cover with your name, contact details and a strong product image.
- Project one on a single page.
- Project two on a single page.
- Project three on a single page.
- Contact page.
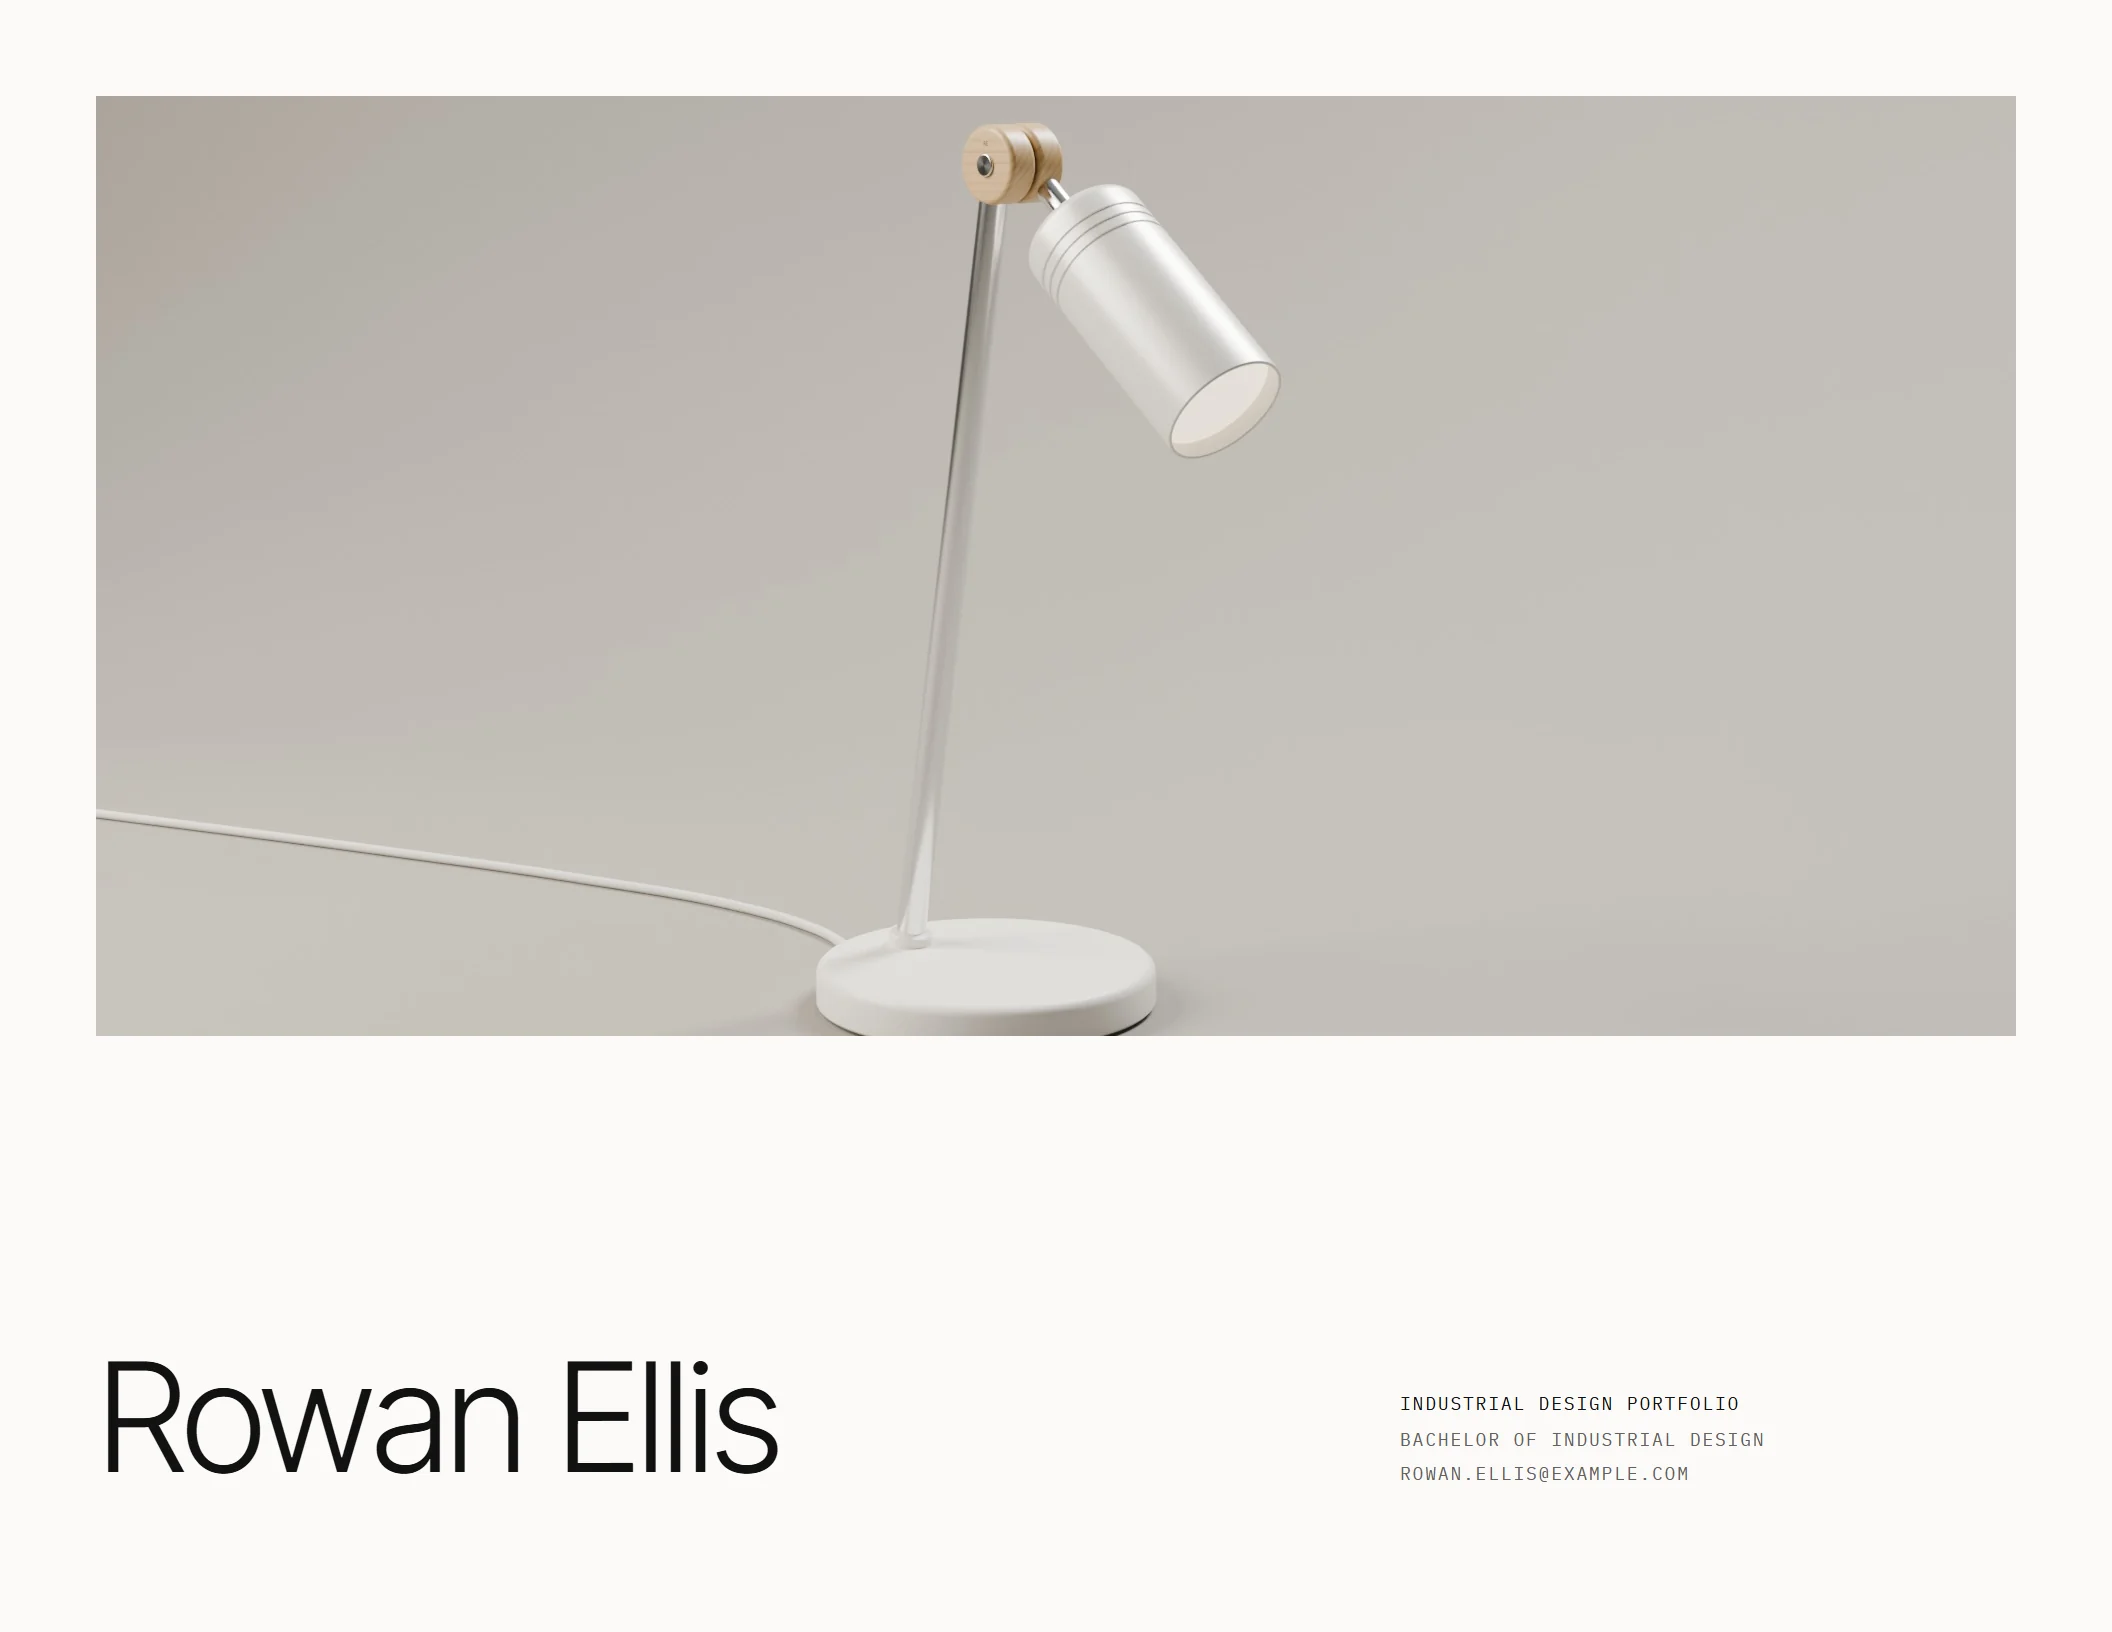
Choose a cover image that reads at page size, with your name easy to find. The cover guide explains image and type arrangements you can use with a product render or prototype photograph.
For a ten-page core, use:
- Cover.
- About and resume.
- Project one opener.
- Project one image body page.
- Project one drawings page.
- Project two opener.
- Project two body page.
- Project three opener.
- Project three body page.
- Contact.
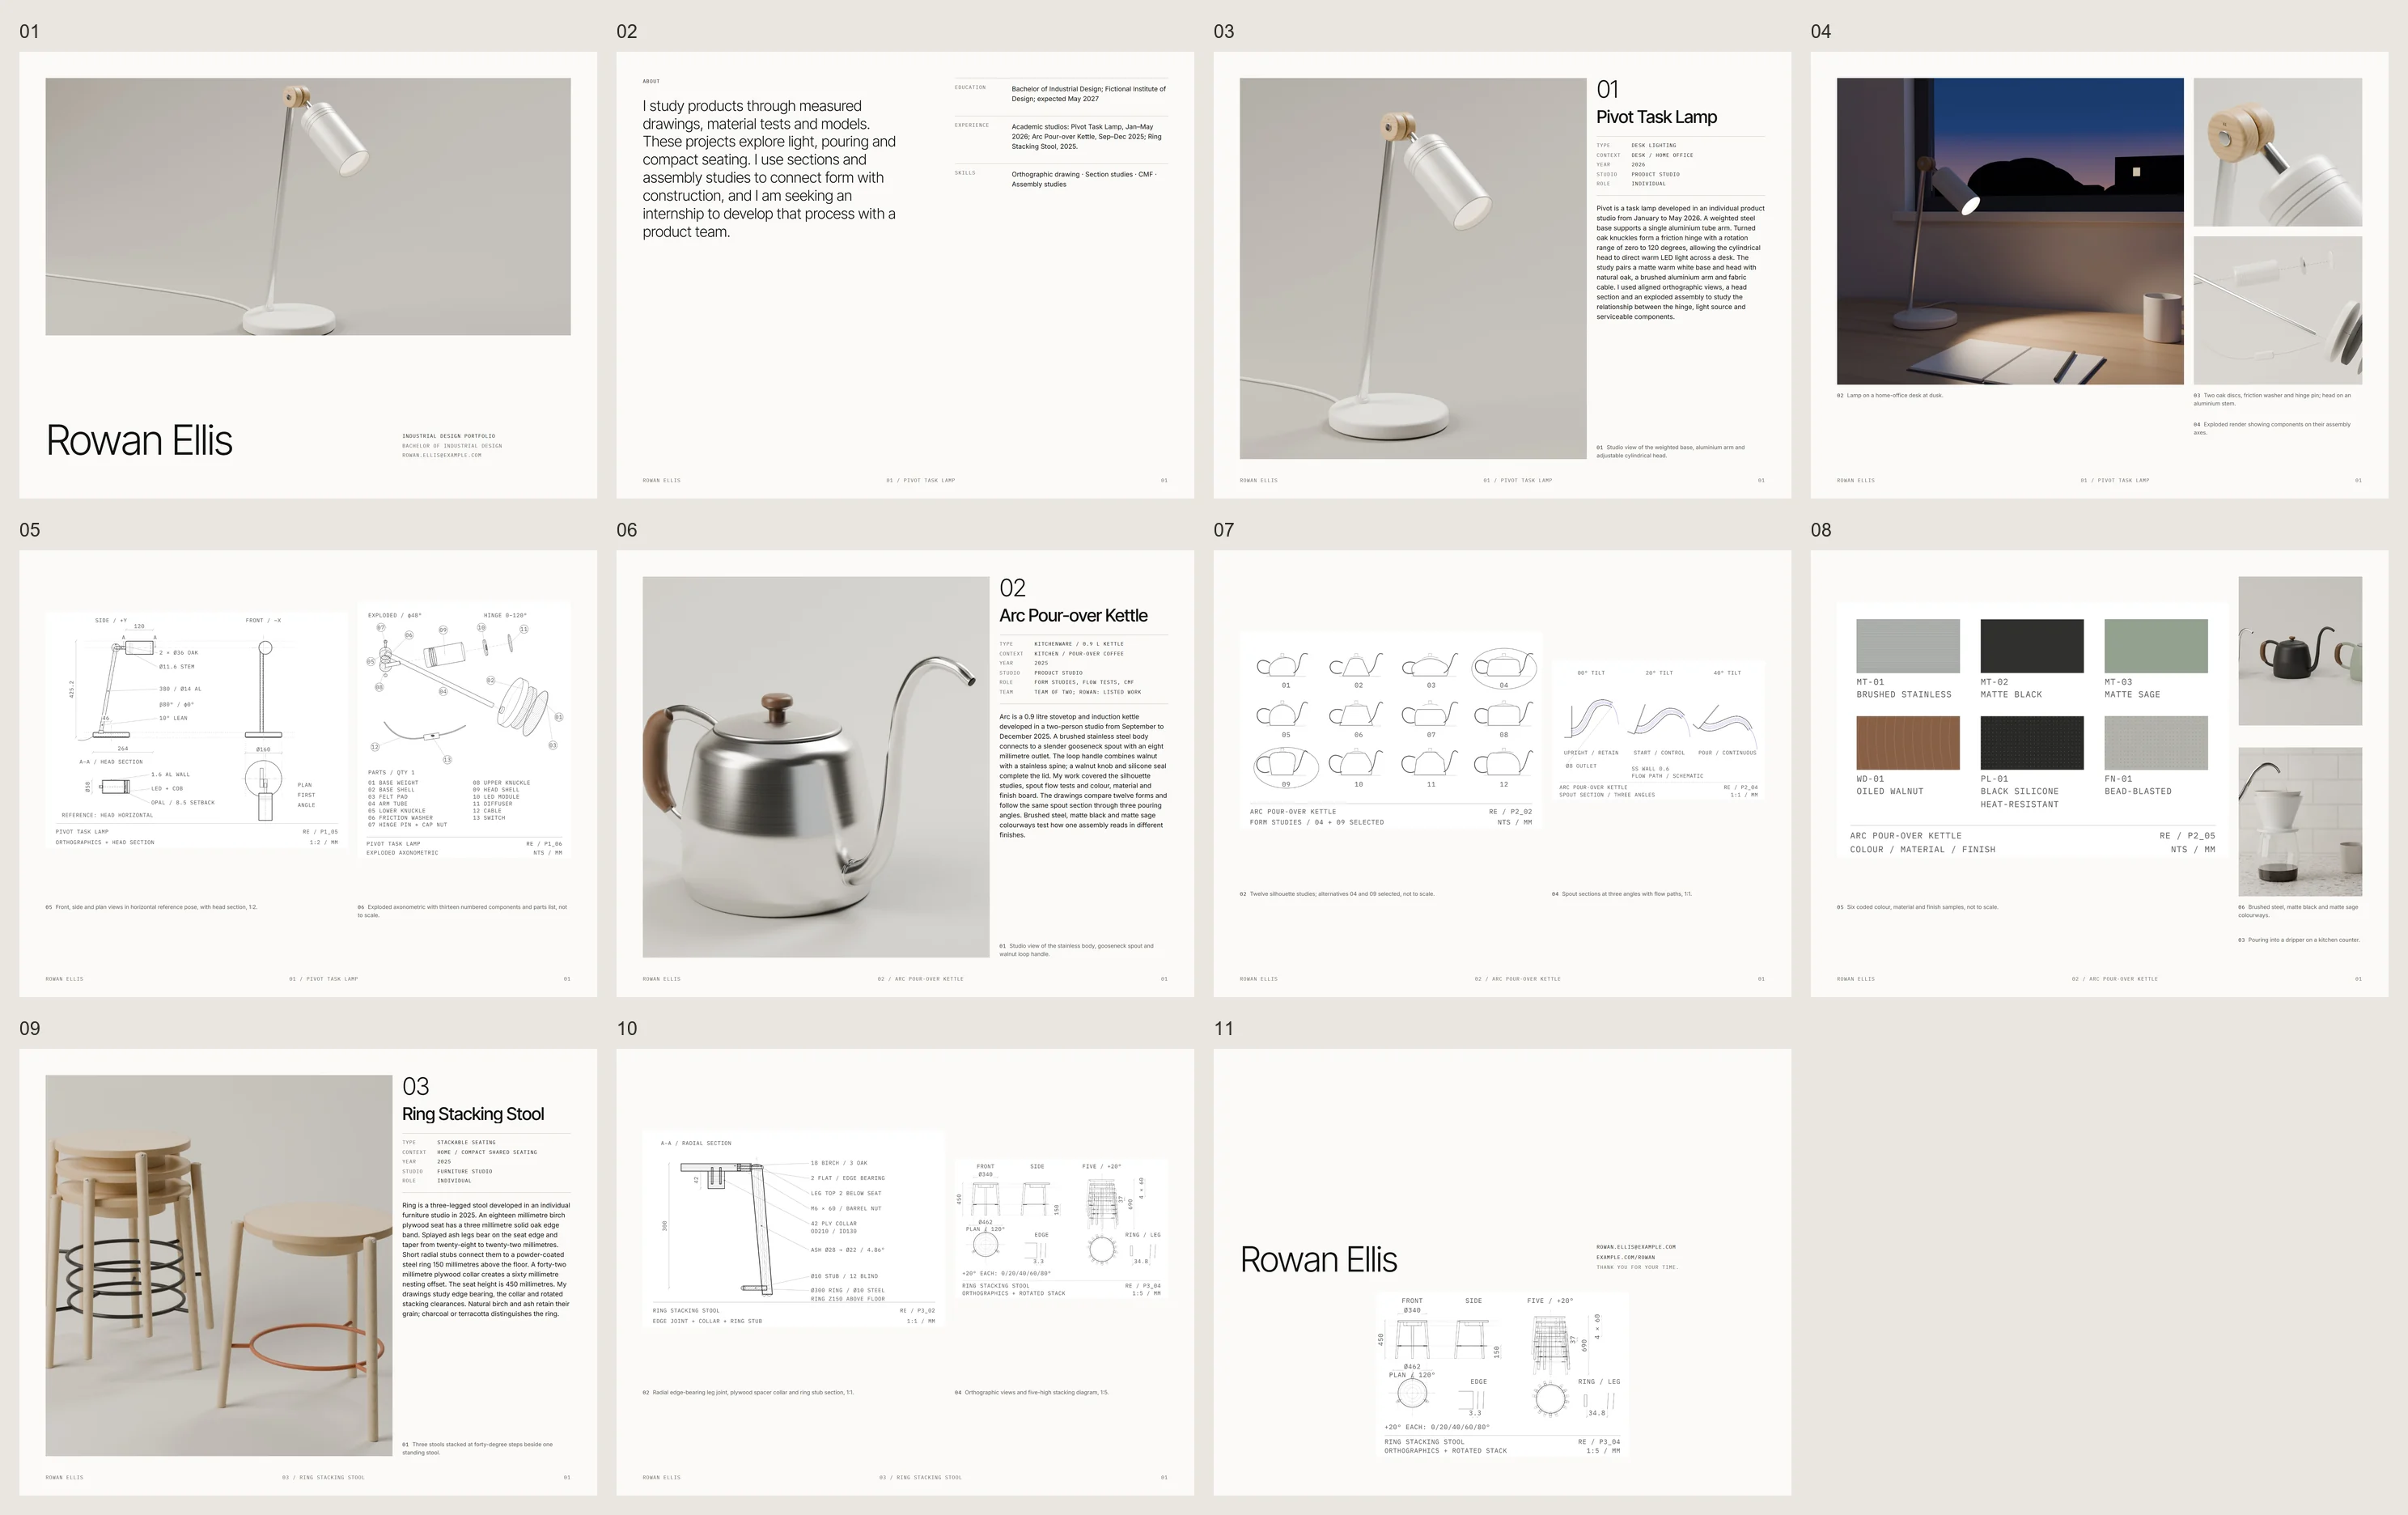
Use the first image body page for selected process images. Add pages toward fourteen when drawings, CMF or context need more space. Keep the about statement within 35 to 50 words beside compact resume entries.
Open with the object, then explain its development
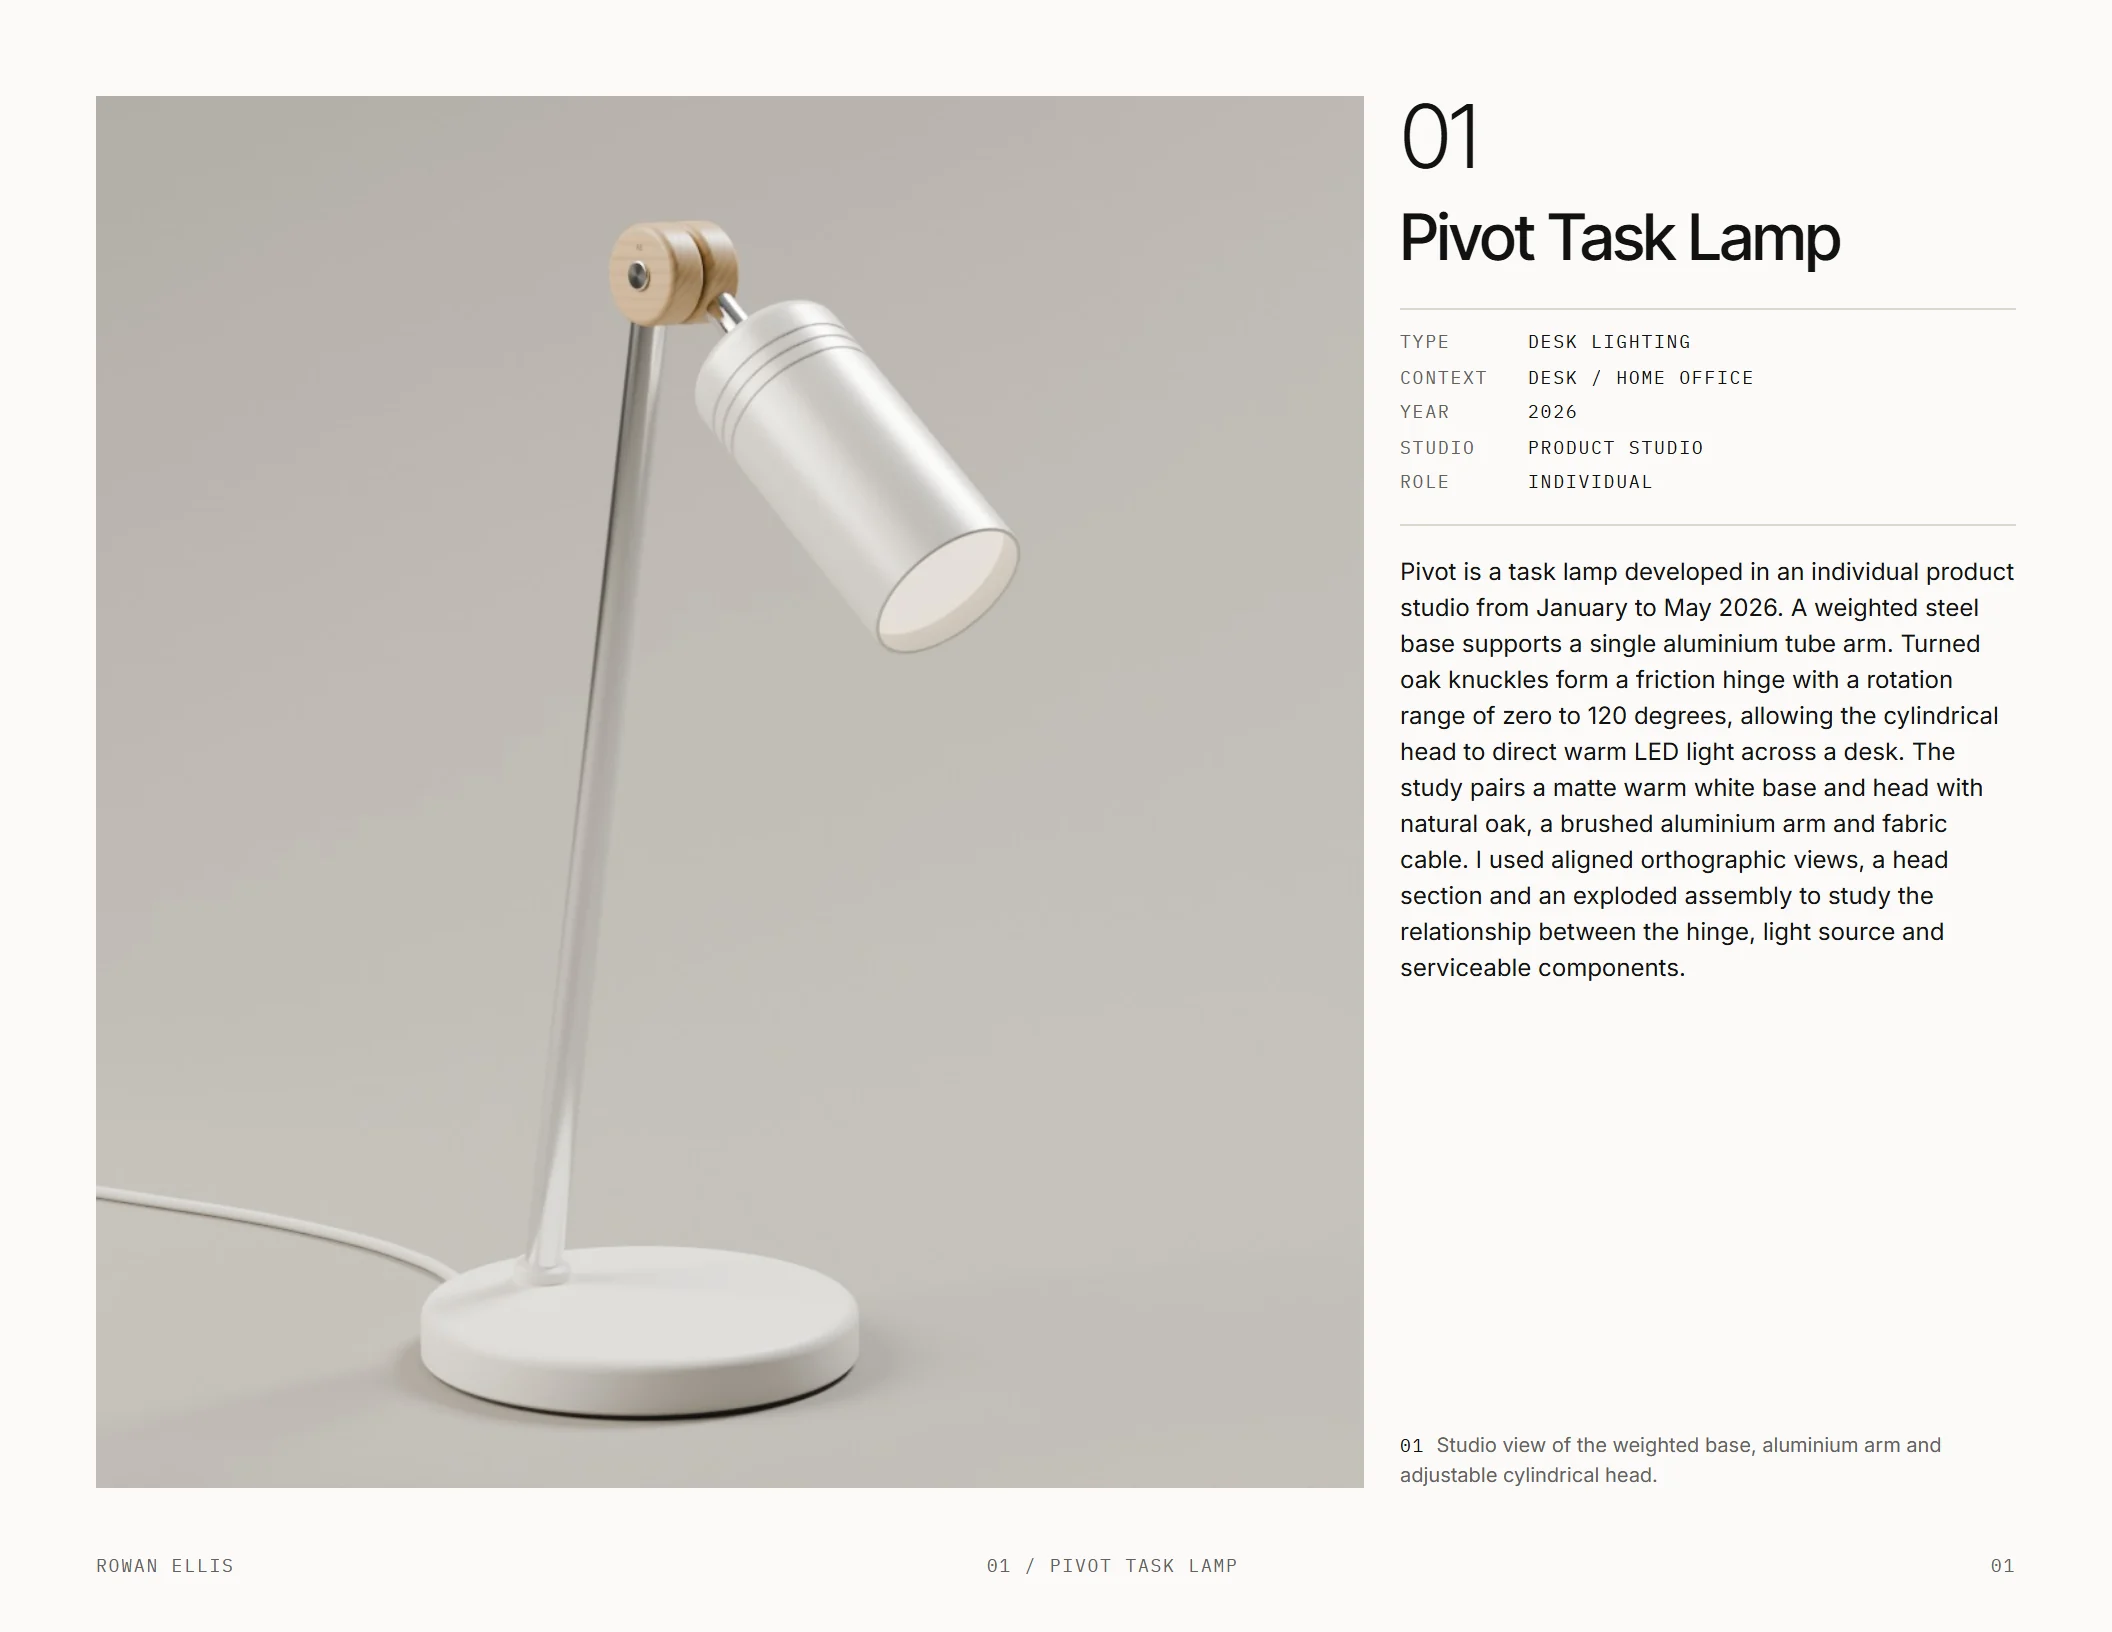
Lead with a hero render or prototype photo across eight columns. Use four for the title, project facts and an 80 to 120 word description. Record the project type, year, course or studio, your role and team in a consistent order.
Follow the opener with process, then the exploded view and technical drawings, then CMF and context. Combine related material where it remains readable. In the short sample, pair the hero with one supporting image or drawing and reduce the description.
Select process that explains a decision
Arrange ideation as a grid of studies and mark the directions you developed. Keep alternatives at a similar size. Select one or two decision points and connect each change to the final object.
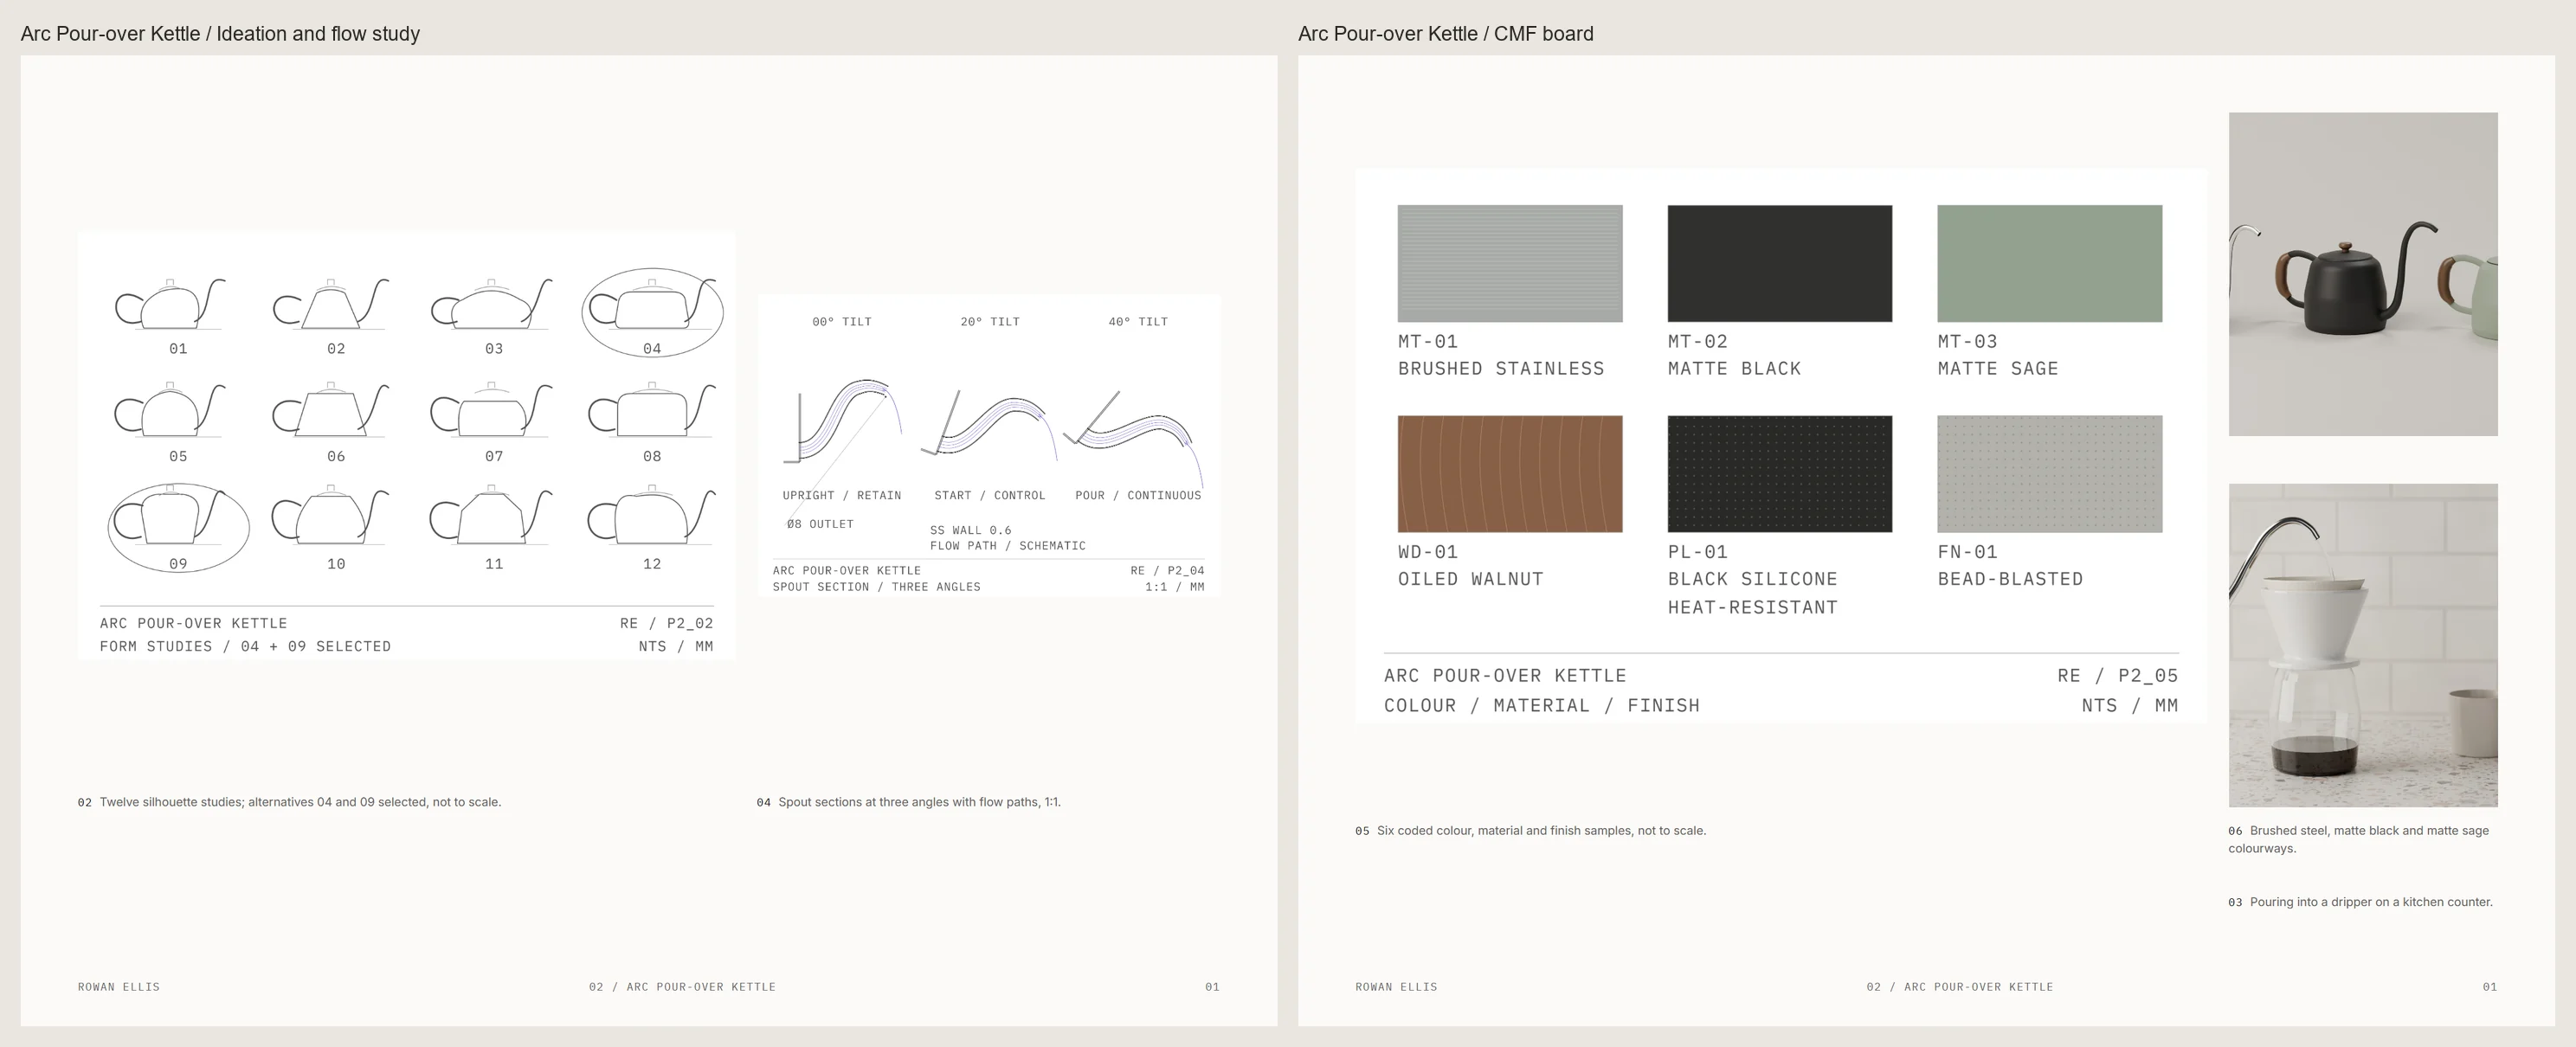
The fictional kettle pages combine an ideation grid with two directions circled, a spout flow study and a CMF board. The ideation images are clean line studies. Describe your own material accurately as sketches, digital studies or diagrams, according to how you made it.
Include physical mock-ups or tests when they explain a decision. Photograph them clearly and label what you examined, such as grip or access to a joint. Record what you observed without claiming results you did not establish. Leave repeated sketches out so the selected development has room.
Make drawings and exploded views readable
Align front, side and top orthographic views on projection lines. Dimension in mm and add a section where it explains the build. Keep the section cut identifiable in a related view so your reader can locate it within the object.
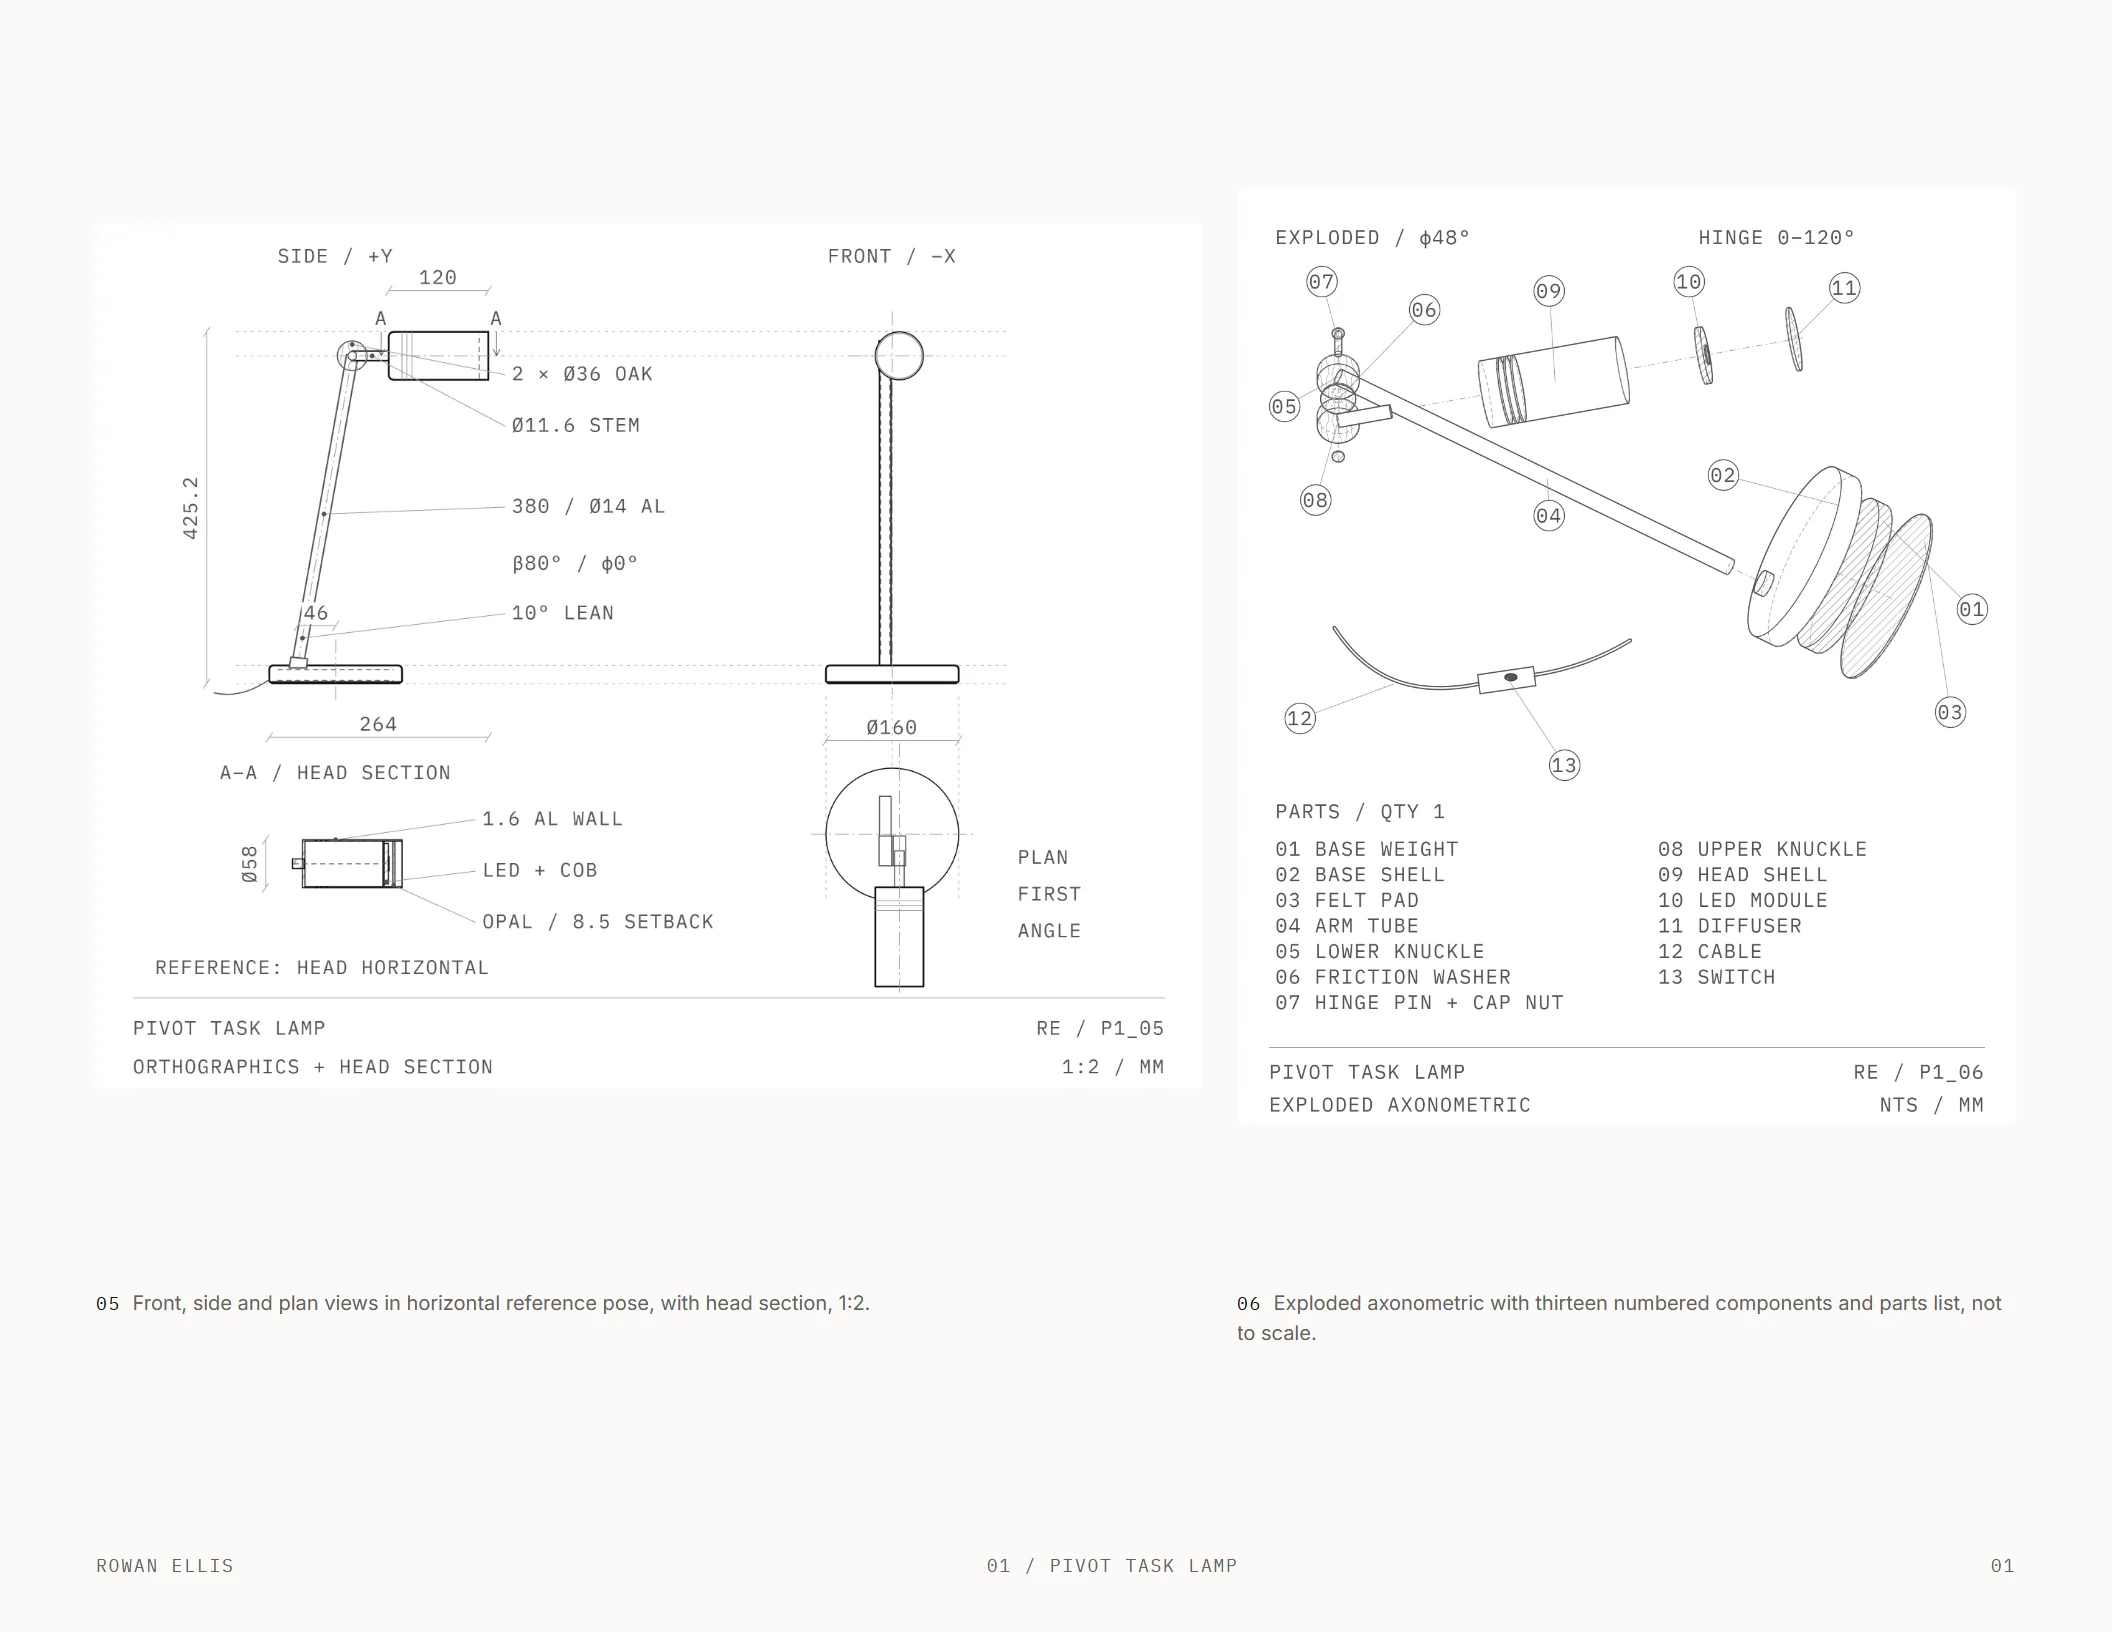
The fictional Pivot Task Lamp pairs orthographic views and a head section with an exploded axonometric. Number the exploded parts and match each number to a parts list. Keep the same component names across drawings and captions; separate parts enough to reveal their assembly order.
Explain manufacturing intent through the work you developed. A material label can identify a steel base shell; a joint detail can explain a friction hinge. State which details remain proposals. Include drawing scales and check them against the intended printed size after placement.
Use at least 7 pt drawing text and 0.25 pt lines at placement, following the annotated examples. Open the exported PDF at page size to check labels and fine marks. Give a crowded drawing more space before shrinking its information.
Match CMF boards to the renders
Label swatches with codes and names, and carry those codes to the relevant surfaces or colourways. Photograph physical samples in even light with the camera square to the board. A digital board also works when its labels clearly identify the proposed materials and finishes.
In the fictional kettle board, MT-01 is brushed stainless, MT-02 matte black powder-coat and MT-03 matte sage powder-coat. WD-01 is oiled walnut, PL-01 heat-resistant black silicone for the lid seal, and FN-01 a bead-blasted finish sample. Keep a finish sample distinct from a selected colourway.
Match the rendered colourways to your board. The kettle's brushed steel, matte black and matte sage versions provide that comparison. Check the handle and smaller components too, so changing a body finish does not leave the material story unclear.
Show the object you modelled
Use studio shots on a neutral sweep to make the silhouette and surface transitions clear. Add one view in context to explain scale and use. Compare every view with the model and drawings, including joints and the thickness of visible parts.
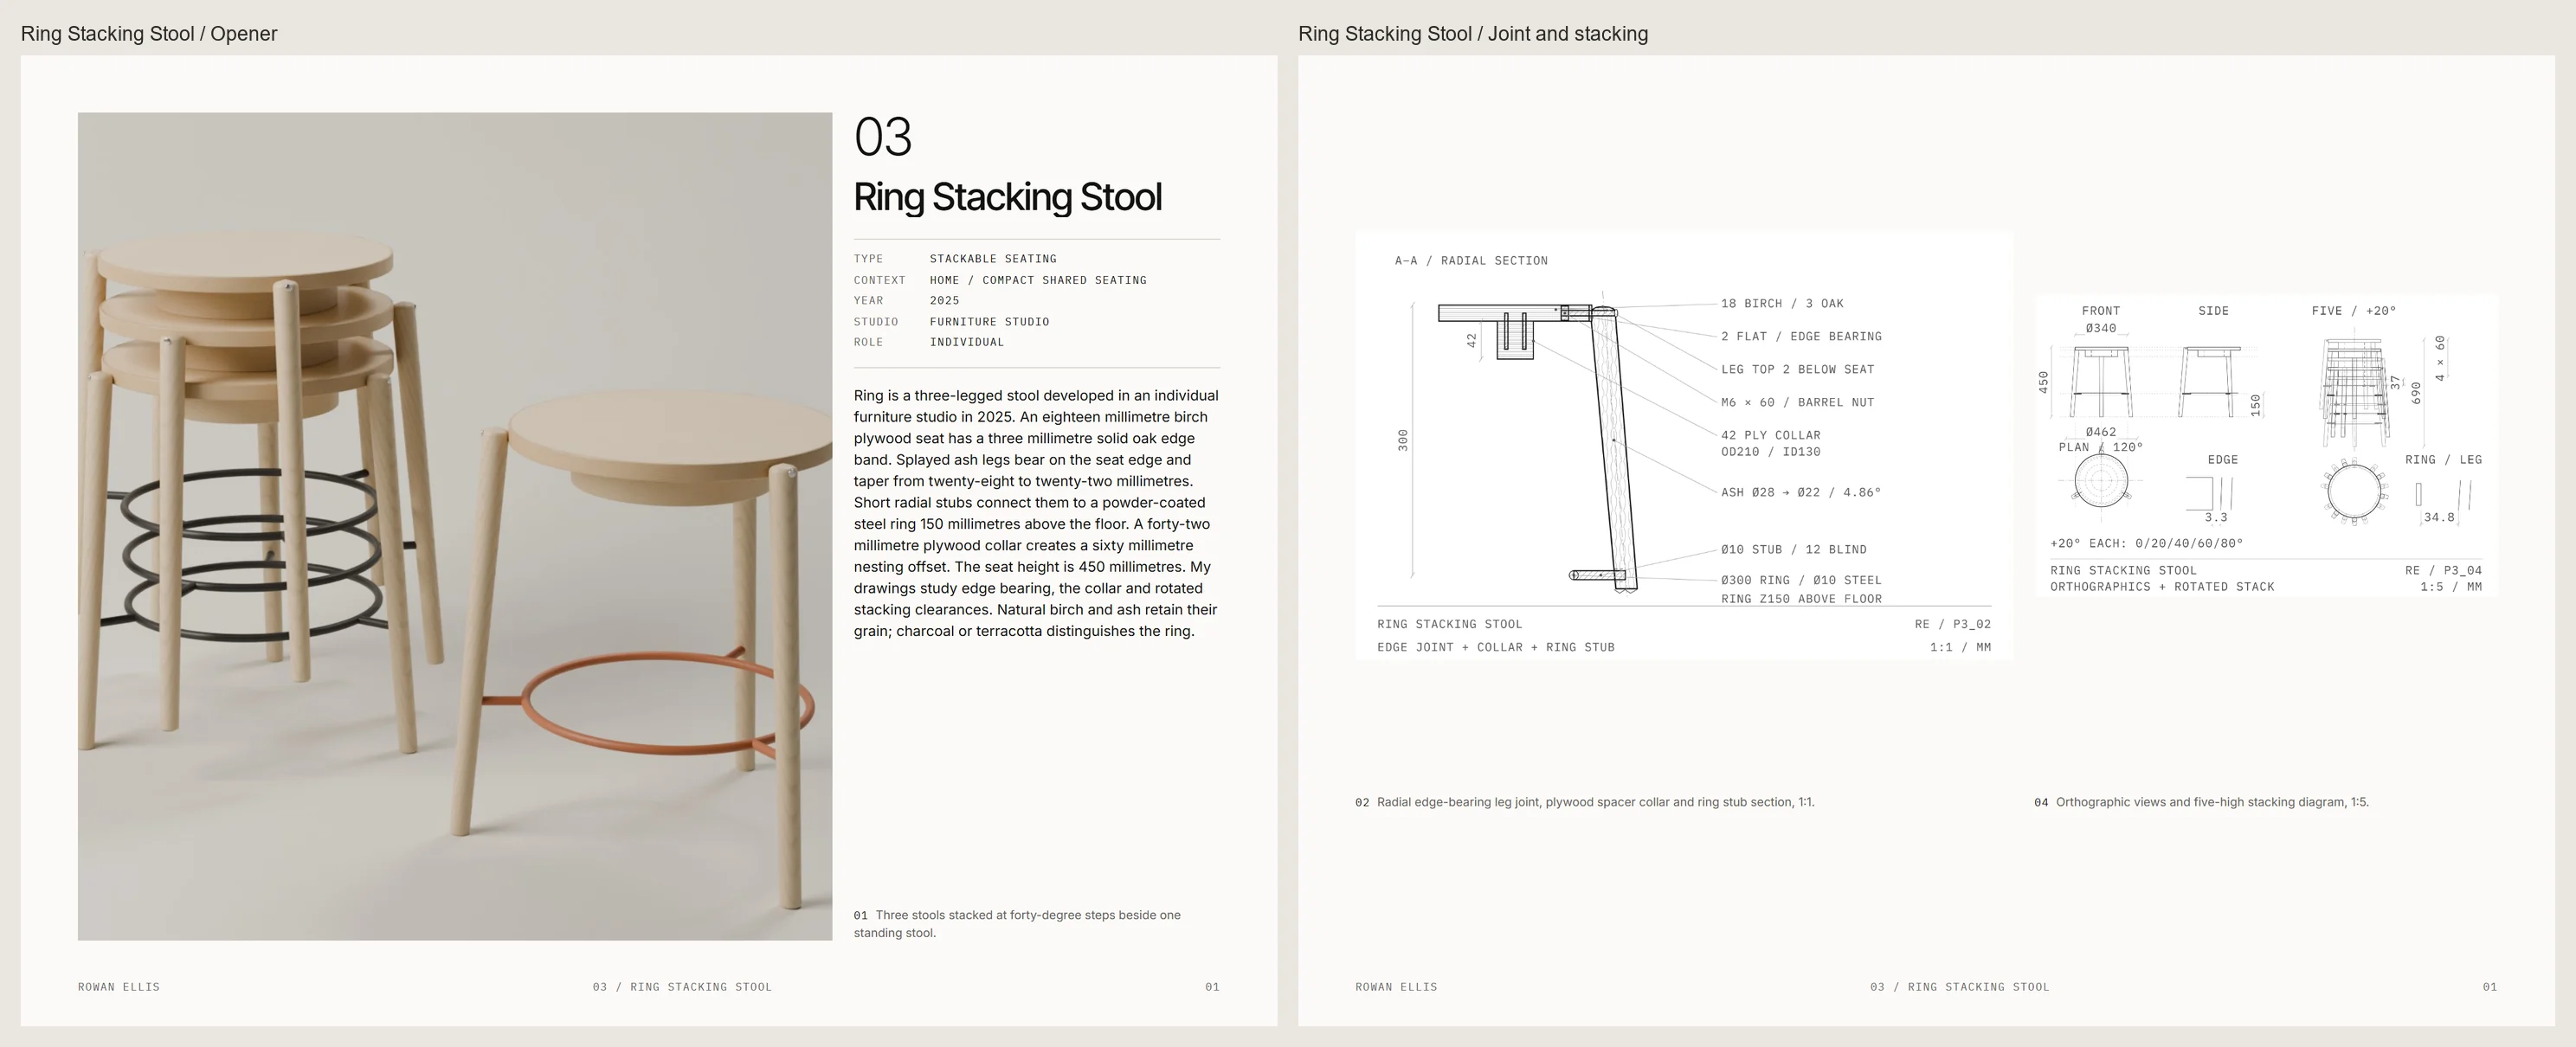
The fictional Ring Stacking Stool pairs its opener with a joint detail and stacking diagram. Those drawings let you follow the connection and stacking arrangement beyond the hero image. Use the same check on your own pages: each supporting view should explain something you designed.
Label renders and prototype photographs clearly. If a physical model tests form only, say so beside the photograph. If you use AI, compare the result against your model. AI may draw, style and render geometry you modeled; it never adds to or changes your design.
Use one grid and a consistent type direction
Set up landscape US Letter or A4 pages with 0.5 in margins, 12 columns and 0.1875 in gutters. Follow the shared grid in the layout guide. Its divisions accommodate a wide exploded view or paired studies within consistent alignments.
Choose your type direction: a neutral grotesk, a serif and sans pairing, or a wide grotesk with titles in caps. Reserve monospace for small labels and metadata. Start body text around 9 to 10 pt, use paragraph styles and check the result at actual page size.
Use light pages for printing, or check a dark edition for clear linework and caption contrast. Keep drawing backgrounds consistent with your choice. Edit descriptions before reducing type, and keep captions to 15 words or fewer.
Check the PDF you will send
Keep your email PDF under 10 MB and follow the application's submission limit. Read the exported file at page size, including parts lists and contact details. If compression damages drawings, remove repeated images or adjust image exports and check again.
For print, export at 300 ppi with bleed and verify scales at the intended size. Give the work sample and core distinct filenames. Use the portfolio website guide to carry your selected projects into a web version with matching credits.
The fictional sample in this guide
The figures show fictional industrial design student Rowan Ellis and three fictional projects: Pivot Task Lamp, Arc Pour-over Kettle and Ring Stacking Stool. All use the Skiaform Portfolio page system. Replace the fictional work and personal details with your own.
You can compare the same page structure in the interior design portfolio guide and landscape architecture portfolio guide. Keep your own supporting drawings specific to the objects you developed.
The Skiaform Portfolio portfolio template for InDesign uses the same page system. It includes an industrial design edition with Rowan Ellis's pages as the sample, in US Letter and A4, light and dark, alongside the architecture and interior design editions. Replace the sample content with your own work and contribution credits.
FAQ
How many projects should I include?
Keep your selection to 3 to 5 strong projects. Give at least one enough space for technical drawings. Use additional pages only when they explain work you have developed.
What does an industrial design portfolio look like?
It combines clear product images with selected process and drawings that explain the build. Your project facts establish the brief and your role. CMF boards and context views connect material choices to the final object.
Should I include sketches?
Include sketches that explain an option or a change you made. Mark the directions you developed and connect them to the final design. Check that light marks remain visible in the exported PDF.
Should I include CAD screenshots?
Prefer clean renders and technical drawings for explaining your final design. Include a CAD screenshot only when it explains something specific, such as a modelling decision. Crop it to keep the relevant information readable.
Should I use renders or prototype photos?
Use whichever explains the work you actually made, and include both when they serve different purposes. Label each clearly. State what a prototype tests so a form study is understood at its actual stage.
How big should the PDF be?
Keep your email PDF under 10 MB unless the application specifies another limit. Check drawing labels and image clarity after export. Remove repeated material before accepting compression that makes the work difficult to read.
Get the free portfolio checklist
A two-page checklist of the portfolio basics, from choosing projects to sending the PDF. It downloads as soon as you sign up. No spam.